Air Brake System Diagrams: Complete Visual Guide to Components, Valves, and Circuits for CDL Drivers
Master air brake system diagrams including the air brake quick release valve diagram, treadle valve, and full circuit layouts for your CDL air brake test. 🆕

Understanding an air brake quick release valve diagram is one of the fastest ways to make sense of how an entire commercial vehicle stops safely on the road. When you trace the lines from the compressor to the wheel chambers, the whole system clicks into place: dry air flows in, pressure regulates itself, and the foot pedal sends a controlled signal that releases almost instantly when you lift off.
For new CDL students, diagrams turn an abstract maze of hoses into a logical map you can memorize, recall under exam pressure, and explain to an inspector with confidence during a pre-trip walk-around.
This complete visual guide walks through every major circuit you will see on the air brakes portion of your knowledge exam and on the truck itself. You will learn how the supply circuit feeds two protected reservoirs, how the service circuit splits between the primary and secondary tanks, and how parking and emergency functions ride along the same plumbing without ever interfering with one another. Each section ties a labeled diagram concept directly to a real-world job, such as draining tanks or checking pushrod travel.
The diagrams that matter most for the CDL air brake test include the compressor and governor layout, the treadle (foot) valve schematic, the relay valve diagram, the spring brake chamber cutaway, and of course the quick release valve. Each component has a distinct symbol, a distinct port count, and a distinct failure mode that examiners love to ask about. Once you can sketch these from memory, multiple-choice questions about leakage rates, low-pressure warnings, and emergency applications become almost trivial because you can see the answer rather than guess at it.
Diagrams also help you avoid the most common rookie mistakes. Students who only memorize definitions often confuse the quick release valve with the relay valve, or they assume the spring brakes apply through hydraulic pressure when in fact they apply mechanically through powerful springs as air pressure drops. Looking at a proper schematic shows you the truth in a single glance: the spring brake holds the truck only when air is gone, and the service brake holds it only when air is applied. Two opposite logics, one safe outcome.
We will also cover modern variations such as anti-lock braking system sensors, automatic slack adjusters, and the air dryer with its purge valve cycle. These are now standard on every Class 8 tractor sold in the United States, and exam writers include them more often each year. Knowing where the dryer sits in the schematic between the compressor and the wet tank tells you why dumping moisture in winter is non-negotiable and why air brake antifreeze methanol injectors used to be standard equipment on older fleet trucks.
By the end of this article you will be able to read any factory service manual diagram, identify each labeled component, predict what happens when one fails, and answer about ninety percent of the diagram-based questions on a typical CDL practice test air brakes section. We have built the structure around the way real instructors teach the material at certified third-party schools, so the order of concepts mirrors what you will hear in a classroom setting before your road test scheduling appointment.
Take your time with each section, sketch the diagrams on scratch paper as you read, and revisit the practice quizzes embedded throughout. Repetition with a pencil locks the layout into long-term memory far better than re-reading the manual passively. Three or four sketch sessions over a week will outperform ten hours of last-minute cramming the night before your exam appointment, especially when the questions get tricky around dual circuit failures and emergency stopping distances.
Air Brake System Diagrams by the Numbers

Core Components You Must Identify on Any Diagram
Belt or gear driven from the engine, this pump fills the system with compressed air whenever the governor calls for more pressure. Diagrams show it as the upstream box feeding the dryer and wet tank.
The brain that tells the compressor when to load and unload. Cut-in around 100 psi, cut-out at 125 psi. On schematics it sits adjacent to the compressor with a thin signal line.
Removes moisture before air reaches the tanks. The purge cycle dumps water and oil at every governor cut-out. Replaces older alcohol evaporators that needed air brake antifreeze.
Wet tank collects moisture first, then feeds primary and secondary dry tanks. Each tank has a drain valve at the bottom and a one-way check valve at the inlet on the diagram.
Convert air pressure into mechanical force through a diaphragm and pushrod. Spring brake chambers contain a powerful coil that applies parking force when air pressure drops below 60 psi.
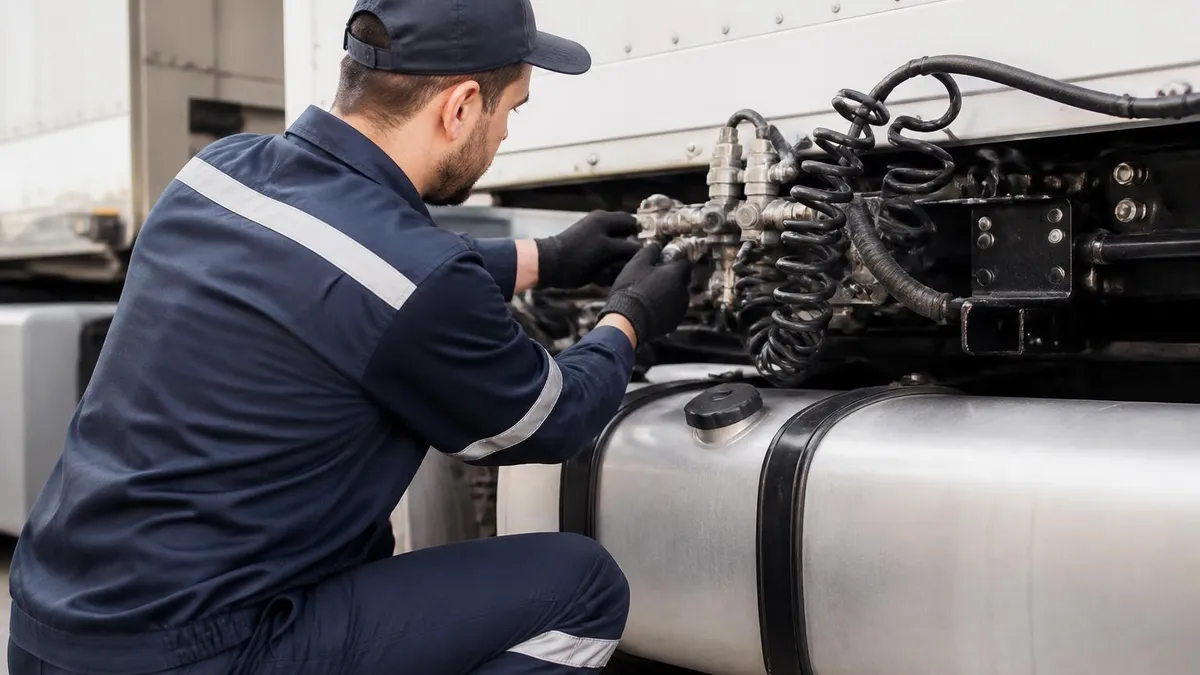
The air brake quick release valve diagram looks deceptively simple, but its function is critical to safe stopping performance on every commercial truck. Picture a small T-shaped body with one inlet at the top connected to the treadle valve and two outlets on the sides connected to the front service brake chambers. Inside sits a flexible rubber diaphragm that lifts when application air arrives and seals when that air dissipates. The clever part is the exhaust port on the bottom that vents trapped chamber air directly to atmosphere the instant you release the pedal.
Without this valve, application air would have to travel all the way back through the treadle to escape, which would take a full second or more and cause the front brakes to drag long after you intended to roll. On a tractor moving sixty miles per hour, that delay translates to almost ninety feet of unnecessary stopping distance, which is the difference between a controlled lane change and a rear-end collision. The quick release valve solves this by giving trapped chamber air the shortest possible path back to the outside world the moment supply pressure drops.
On the schematic, look for the valve mounted near the front axle, typically on a cross member or firewall bracket. The inlet line will be a single hose traced back to the foot valve, while the two outlet lines split left and right to feed each front brake chamber symmetrically. The exhaust port is almost always pointed downward and protected by a small mesh screen to keep insects and road debris from clogging the passage. A clogged exhaust port is one of the most common diagnostic findings on older highway tractors.
The mechanical operation is elegant. When you press the pedal, application air pushes down on the diaphragm, which closes the exhaust passage and opens the route to the front chambers. When you release the pedal, the application air upstream of the valve vanishes, the diaphragm springs upward, and the exhaust port opens wide. Chamber air rushes out in about half a second, well within the time required by federal motor carrier safety regulations for a properly functioning service brake circuit on any class of vehicle.
Compare this to the relay valve, which performs a similar function for the rear chambers but uses tank air as its source rather than relying solely on signal air to push the application. Many students confuse the two because both have a quick release feature, but the relay valve is much larger, has four ports instead of three, and includes a separate supply line from the rear service reservoir. The diagram makes this difference unmistakable once you have studied both side by side for ten or fifteen minutes.
You will see this exact layout repeated on your cdl air brake test in several forms. Some questions ask you to identify the valve by its port count, others by its location, and others by what failure mode would result if the exhaust port became plugged. The most common correct answer to that last question is that the front brakes would drag after release, causing premature lining wear, glazed drums, and possible smoke from overheated friction material under sustained highway driving conditions.
Modern trucks built after 2017 often use a slightly modified quick release valve with an integrated pressure sensor that feeds data to the electronic stability control module. The basic mechanical principle remains identical, but the diagram now includes a wiring pigtail with two or three pins. If your exam study guide is older than five years, expect to see the simpler three-port version on the test, but be aware that real trucks in modern fleets may have the sensor-equipped variant installed instead.

Air Brake Practice Test Questions
Prepare for the Air Brake Test exam with our free practice test modules. Each quiz covers key topics to help you pass on your first try.
Air Brake Adjustment & Testing
Air Brake Exam Questions covering Adjustment & Testing. Master Air Brake Test concepts for certification prep.
Air Brake Air Pressure Regulation & Control
Free Air Brake Practice Test featuring Air Pressure Regulation & Control. Improve your Air Brake Exam score with mock test prep.
Air Brake Emergency Procedures & Safety Pr...
Air Brake Mock Exam on Emergency Procedures & Safety Protocols. Air Brake Study Guide questions to pass on your first try.
Air Brake Legal Requirements & Compliance
Air Brake Test Prep for Legal Requirements & Compliance. Practice Air Brake Quiz questions and boost your score.
Air Brake Pre-trip Inspection Procedures
Air Brake Questions and Answers on Pre-trip Inspection Procedures. Free Air Brake practice for exam readiness.
Air Brakes Basic
Air Brake Mock Test covering Air Brakes Basic. Online Air Brake Test practice with instant feedback.
Air Brakes (Reading)
Free Air Brake Quiz on Air Brakes (Reading). Air Brake Exam prep questions with detailed explanations.
Air Brake System Components & Functions
Air Brake Practice Questions for System Components & Functions. Build confidence for your Air Brake certification exam.
Air Brake Test Adjustment & Testing
Air Brake Test Online for Test Adjustment & Testing. Free practice with instant results and feedback.
Air Brake Test Air Brake Driving Technique...
Air Brake Study Material on Test Air Brake Driving Techniques & Vehicle Control. Prepare effectively with real exam-style questions.
Air Brake Test Air Brake Maintenance & Tro...
Free Air Brake Test covering Test Air Brake Maintenance & Troubleshooting. Practice and track your Air Brake exam readiness.
Air Brake Test Air Pressure Regulation & C...
Air Brake Exam Questions covering Test Air Pressure Regulation & Control. Master Air Brake Test concepts for certification prep.
Air Brake Test Emergency Procedures & Safe...
Free Air Brake Practice Test featuring Test Emergency Procedures & Safety Protocols. Improve your Air Brake Exam score with mock test prep.
Air Brake Test Legal Requirements & Compli...
Air Brake Mock Exam on Test Legal Requirements & Compliance. Air Brake Study Guide questions to pass on your first try.
Air Brake Test Pre-trip Inspection Procedures
Air Brake Test Prep for Test Pre-trip Inspection Procedures. Practice Air Brake Quiz questions and boost your score.
Air Brake Test System Components & Functions
Air Brake Questions and Answers on Test System Components & Functions. Free Air Brake practice for exam readiness.
Air Brake MCQ
Air Brake Mock Test covering MCQ. Online Air Brake Test practice with instant feedback.
Treadle, Relay & Foot Valves Explained for the CDL Air Brake Test
The treadle valve, also called the foot valve or dual brake valve, sits directly under the driver pedal and modulates air pressure to both the primary and secondary service circuits simultaneously. On an f-750 air brake treadle valve you will find two distinct inlet ports, two outlet ports, and a balance piston between them that ensures equal application even if one tank loses pressure during a circuit failure scenario.
Diagrams show the treadle as a stacked dual-chamber body with the primary on top and secondary below. Springs return the plunger to its closed position when your foot leaves the pedal. Modern treadles include a kickdown mechanism that limits maximum application pressure to about ninety psi, preventing wheel lockup on slick surfaces while still providing adequate stopping force on dry pavement.
Using Diagrams vs Memorizing Definitions for the Air Brake Endorsement
- +Visual layouts stick in memory three times longer than text-only definitions
- +You can sketch from memory during pre-trip explanations to the examiner
- +Failure mode questions become intuitive when you see the circuit
- +Color-coded primary and secondary lines reinforce dual circuit logic
- +Diagrams reveal which components share housings and which stand alone
- +Practice sketching builds confidence for the road test inspection portion
- +Real-world troubleshooting later in your career relies on diagram literacy
- −Diagrams alone do not cover federal regulations or numeric specifications
- −Some textbook diagrams use outdated symbols from pre-2010 equipment
- −Without context, port labels can confuse new students initially
- −Sketching takes more study time than reading flashcards passively
- −Schematics omit physical scale, so component size is not obvious
- −State-specific manuals may use slightly different symbol conventions
- −Diagrams cannot replicate the feel of operating real equipment

Diagram Reading Checklist for the CDL Air Brakes Practice Test
- ✓Identify the compressor and trace the supply line to the air dryer
- ✓Locate the governor and confirm cut-in and cut-out signal connections
- ✓Find the wet tank and verify check valves protect the dry reservoirs
- ✓Trace the primary circuit from its tank to the rear service chambers
- ✓Trace the secondary circuit from its tank to the front service chambers
- ✓Identify the treadle valve and confirm dual inlet and outlet ports
- ✓Locate the quick release valve near the front axle with exhaust pointed down
- ✓Find the relay valve at the rear axle with all four ports labeled correctly
- ✓Trace the parking brake control line through the dash valve to spring chambers
- ✓Confirm the low pressure warning device activates above sixty psi minimum
The Three-Two-One Rule for Quick Release Identification
Quick release valves have three ports, two outputs to the front chambers, and one exhaust pointed at the ground. Relay valves have four ports, two for supply and signal, two for delivery and exhaust. Memorize this contrast and you will answer almost every valve identification question correctly on the first attempt.
Dual circuit air brake systems separate the supply, control, and delivery functions into two completely independent halves so that a failure in one circuit cannot disable the other. On a typical schematic, the primary circuit is drawn in one color (often red or solid lines) and the secondary in another (blue or dashed). The primary normally services the rear axle group and the secondary the front axle, though some heavy-duty tractors reverse this assignment depending on manufacturer preference and chassis configuration choices made at the factory.
When you study any dual circuit diagram, your first task is to identify the split point. This is the moment air leaves the wet tank and enters two separate dry tanks through individual check valves. From that split forward, the two circuits never share a single component except for the treadle valve itself, which contains internal isolation between its primary and secondary halves. This redundancy is what allows the truck to retain at least partial braking even after a catastrophic line rupture on one side of the system.
The emergency layout overlays a third circuit on top of the two service circuits. This is the parking brake circuit, which uses spring-loaded chambers and a control valve mounted on the dashboard. The yellow diamond-shaped knob releases air to hold off the springs during normal operation. When you pull it, air vents from the spring chambers and the powerful coils mechanically clamp the rear brakes. The diagram makes this clear by showing the spring brake chamber as a tandem unit with two distinct sections sharing a single pushrod assembly.
Emergency application happens automatically if system pressure drops below approximately forty psi. The dash valve pops out by spring force, dumping spring chamber air and applying the parking brakes regardless of driver input. This is why a slow leak left unattended will eventually bring the truck to a stop on its own, often at an inconvenient location like a highway shoulder or fuel island. Knowing this automatic safety logic from the diagram helps you answer scenario questions about brake failure during a long downhill grade or a sudden line rupture event.
The anti-lock braking system adds another overlay to the diagram in the form of wheel speed sensors at each axle and an electronic control unit usually mounted on the frame rail. Modulator valves placed in line between the relay and the chambers can dump pressure briefly when a wheel begins to lock. This prevents skidding but does not reduce overall stopping distance compared to a properly applied non-ABS system. The diagram shows ABS components as additional boxes with wiring rather than air lines, distinguishing them clearly from purely pneumatic plumbing on the truck.
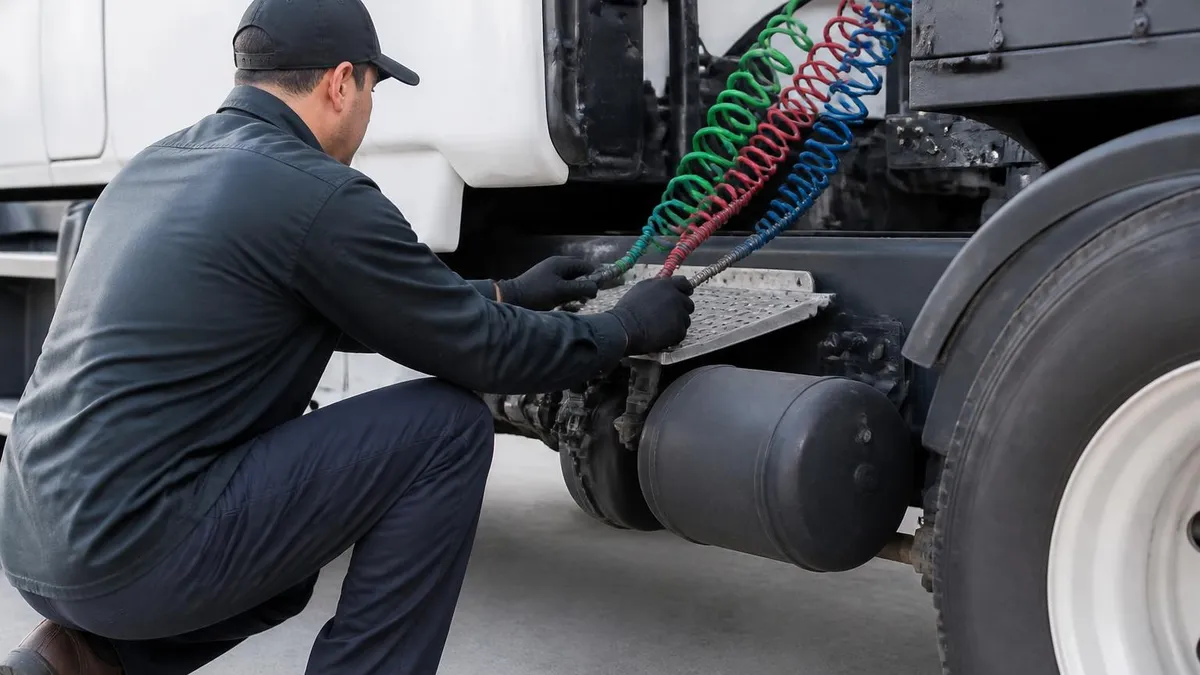
Trailer connections appear on the schematic as two glad hands, color-coded red for emergency supply and blue for service application. The red line keeps the trailer spring brakes released as long as supply pressure is present. The blue line carries control air to the trailer relay valve, which then applies the trailer service brakes proportional to driver pedal input. Disconnecting the red glad hand applies the trailer brakes instantly, which is exactly what the diagram predicts when supply air can no longer hold off the spring chambers on the trailer axles.
Reviewing this dual circuit logic before taking your written exam will help you handle any diagram-based question with confidence. The air brake endorsement section frequently includes a labeled drawing with one component blanked out, asking you to identify the missing piece based on context. If you have traced these circuits a dozen times on paper, the answer will jump off the page before you even finish reading the question stem.
Service brakes apply when air pressure is added to the chamber, while spring brakes apply when air pressure is removed. Confusing these two opposite logics is the single most common reason students fail the air brake portion of the CDL written exam. Study the diagram until the difference is automatic and instant.
Applying air brake system diagrams during your pre-trip inspection is where classroom study meets real-world performance. The examiner will hand you a clipboard or walk beside you while you point to each component and explain its function aloud. If you have memorized the diagram, you can walk the truck in a logical order: start at the compressor under the hood, move to the air dryer on the frame rail, point to the wet and dry tanks beneath the chassis, then trace lines forward to the treadle and outward to the chambers at each wheel position systematically.
During the leakage test portion, the diagram explains why the procedure looks the way it does. With the engine off, the system pressure should be at maximum (around 125 psi). You release the parking brakes, apply the service brake firmly, and watch the gauge. A loss of more than three psi per minute on a single vehicle, or four psi per minute on a combination unit, indicates a leak somewhere in the circuit. The diagram tells you exactly which connections to inspect: glad hands, chamber diaphragms, relay valve seals, and treadle valve internal passages.
The low-pressure warning test also derives directly from the diagram. With the engine off and the system fully pressurized, you tap the service pedal repeatedly to bleed pressure down. Somewhere above sixty psi the warning light and buzzer must activate. The diagram shows this device as a small pressure switch wired to the dash, typically tapped into either the primary or secondary supply line. Knowing its location means you can explain not only what the warning does but why it triggers at that specific threshold during operation.
The spring brake application test is another diagram-driven exercise. You continue bleeding pressure below the warning threshold until the parking brake valve pops out automatically, usually between twenty and forty-five psi depending on the manufacturer and the age of the equipment. The diagram shows the dash valve as a spring-loaded mechanism that requires air pressure to remain seated. When pressure falls too low, the spring overcomes the air, the valve pops, and the spring chambers apply mechanically without any driver input at all.
The air brake test also includes a build-up test that measures how quickly the compressor can refill the system from a low-pressure condition. The diagram tells you the compressor charges the wet tank first, then the dry tanks through check valves. A properly functioning system should build from eighty-five to one hundred psi in forty-five seconds or less at normal engine speed. Slow build-up indicates a worn compressor, a stuck governor, or a major leak that the leakage test should have already caught earlier in the inspection sequence.
Use a methodical inspection rhythm that matches the diagram flow. Many students lose points by skipping back and forth across the truck randomly. If you start at the compressor and walk the system in the same order the air flows, you will not forget any component, and the examiner will recognize your methodical approach as a sign of professional preparation. This rhythm also helps in the real world when you are diagnosing a problem on the side of the road or at a customer dock with a delivery deadline approaching quickly.
Finally, remember that diagrams are tools for understanding, not crutches for memorization. By the time you take your road test, you should be able to look at any truck regardless of make or model and immediately recognize the major components without consulting a chart. This level of fluency comes from sketching, labeling, and explaining diagrams aloud over several weeks of preparation, not from a single all-nighter the day before your scheduled exam appointment at the testing facility.
Practical preparation tips can make the difference between passing your CDL air brakes practice test on the first attempt and having to schedule a costly retake at the local DMV office. Start by printing two copies of every major diagram in this guide: one for studying with labels visible, and one with the labels blanked out for self-quizzing. Sketch the missing labels from memory and then check your work against the answer key. This active recall technique is proven to double retention compared to passive re-reading of the manual.
Form a study group with at least one other student preparing for the same endorsement. Take turns describing diagrams aloud while the other person points to components on a printed schematic. Verbal explanation activates language and motor memory centers in your brain, locking the material into long-term storage far more effectively than silent study alone. The new york air brake style training centers across the country use this technique because decades of student outcome data prove it works for adult learners.
Watch real teardown videos on reputable trucking education channels. Seeing an actual quick release valve disassembled on a workbench, with the diaphragm flipped over to reveal the exhaust passage, brings the diagram to life in a way no textbook can. Match what you see in the video to what you see on the schematic, and the abstract symbols transform into recognizable physical parts. This visual reinforcement pays dividends both on exam day and during your first months on the job as a new commercial driver.
Take at least three full-length practice exams in the week before your scheduled test date. Time yourself, simulate test conditions, and review every missed question with the diagram open beside you. Identify patterns in your wrong answers: are you confusing primary and secondary circuits, mixing up valve types, or misreading port labels? Targeted review of weak areas in the final days before the exam produces dramatically better outcomes than another general review pass over material you already know well.
Bring a sketch pad to your testing appointment if your state allows it. Some examiners permit scratch paper during the written portion. Quickly redrawing a simplified system diagram at the start of the test gives you a reference to consult when diagram questions appear later. Even if you cannot use scratch paper, the act of sketching mentally still organizes your thinking and prevents the panic that sometimes strikes when an unexpected question stem appears on screen during the timed portion of the exam.
Stay rested, hydrated, and arrive at the testing center at least thirty minutes early on exam day. Air brake questions reward calm analytical thinking, not speed. Take the time to read each question stem completely before looking at the answer choices, identify which diagram component the question is asking about, and visualize that component in its place within the larger system. This mental walkthrough takes only a few extra seconds per question and dramatically reduces careless errors caused by rushing through familiar material.
Finally, remember that every professional driver on the road today started exactly where you are right now: staring at a confusing maze of valves, lines, and chambers, wondering how anyone could possibly memorize it all. Within a few weeks of consistent diagram study, the maze becomes a map, the map becomes a story, and the story becomes second nature. Trust the process, sketch every day, and your CDL air brake endorsement will be in your wallet before you know it.
Air Brake Questions and Answers


About the Author
Educational Psychologist & Academic Test Preparation Expert
Columbia University Teachers CollegeDr. Lisa Patel holds a Doctorate in Education from Columbia University Teachers College and has spent 17 years researching standardized test design and academic assessment. She has developed preparation programs for SAT, ACT, GRE, LSAT, UCAT, and numerous professional licensing exams, helping students of all backgrounds achieve their target scores.