Phlebotomy Procedures: Complete Step-by-Step Guide for Certification 2026 July
Master phlebotomy procedures: venipuncture, capillary puncture, order of draw, patient ID, complications. CLSI-compliant guide for NHA/ASCP/NCCT exams. 📚
Phlebotomy procedures are the step-by-step routines a phlebotomist follows to draw blood safely, accurately, and without harming the patient. They sound simple from the outside — stick a needle in a vein, fill a tube, label it, send it off. The reality has dozens of small decisions packed into a five-minute window, and every one of them matters. Skip a hand-wash, mix up an order of draw, write the wrong DOB on a label, and the lab gets a sample that either lies about the patient or has to be redrawn. Neither outcome is good.
This guide walks through the three core blood collection methods you will be tested on and use every shift: venipuncture, capillary puncture, and arterial puncture. We cover the entire workflow — patient identification, supply setup, the actual stick, the phlebotomy order of draw, tube inversion, labeling, and transport. We also flag the complications you will see in real practice and the CLSI standards that define what counts as a correct technique.
Whether you are studying for the NHA CPT, the ASCP, or the NCCT exam, the procedures below are the backbone of the test. Read once for understanding, then re-read with a tube tray in front of you so the muscle memory builds. The exam writers love asking about angle of insertion, tourniquet time, and which color goes before which — and patients, ultimately, depend on you getting those answers right.

Phlebotomy Procedures at a Glance
Patient identification is the first and probably most failure-prone step in the entire workflow. CLSI standard GP41 requires two independent identifiers before a single needle comes out of its sleeve. The accepted pairing is the patient's full legal name plus date of birth, ideally with a medical record number (MRN) confirmed against the wristband and the lab requisition. Asking the patient to state their name and DOB — not just confirm what you read aloud — is the gold standard because confused or sedated patients will often agree with whatever you say.
Match every line of the wristband to the requisition. Name spelled the same? Check. DOB the same digits in the same order? Check. MRN identical? Check. If anything mismatches, stop. Call the nurse, the physician, or the lab. A mislabeled tube is a sentinel event in most hospitals and a fireable offense in most labs. The five minutes you spend resolving a wristband discrepancy are nothing compared with the harm of a wrong-patient transfusion or a misdirected biopsy.
For outpatients without wristbands, photo ID plus a verbal confirmation of name and DOB is the substitute. For unconscious or pediatric patients, a parent or caregiver acts as the verifier, but the physical wristband still rules. Document who verified, when, and by what method if your facility tracks it — many do, especially after a near-miss incident.
Know These Cold
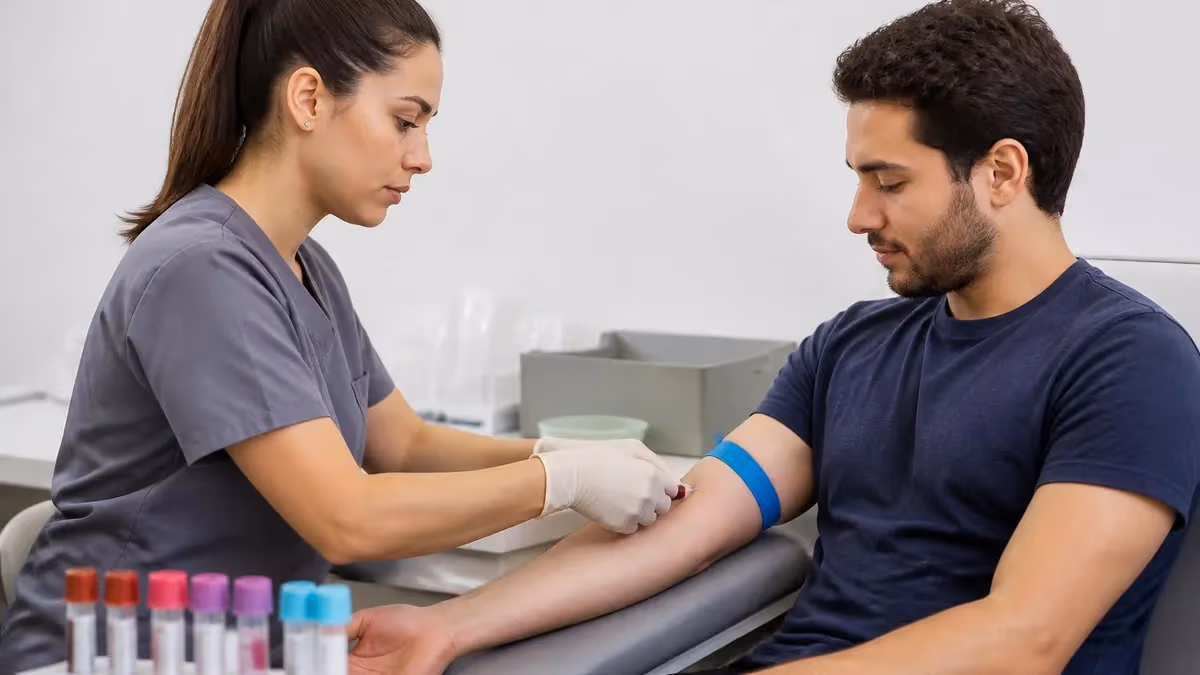
Venipuncture is the standard adult blood draw from a forearm vein — most often the median cubital. Capillary puncture uses a lancet to pierce the skin of a fingertip (adults) or the lateral plantar heel (infants under one year). Arterial puncture samples blood directly from an artery, most commonly the radial, for arterial blood gas analysis. Each has its own angle, anchoring technique, post-stick care, and complication profile. Exam questions love to mix these up — read carefully.
Standard venipuncture has fourteen distinct steps when you count them properly. Step one: verify the physician's order against the requisition and confirm the test, the tube types needed, and any special handling — chilled, light-protected, fasting required, that kind of thing. Step two: gather every supply before you touch the patient. Evacuated tubes in the correct order, butterfly or straight needle, vacuum holder, tourniquet, alcohol prep pads, sterile gauze, tape or bandage, sharps container within arm's reach, and a fresh pair of gloves. Returning to a supply cart mid-draw breaks sterility and wastes time.
Step three is hand hygiene followed by PPE. Wash with soap and water for 20 seconds or use an alcohol-based hand rub, then don gloves before touching the patient. The CDC actually allows hand sanitizer for most situations, but soap is mandatory if your hands are visibly soiled or if the patient has C. difficile or any spore-forming pathogen. Step four: position the patient. Seated or supine with the arm extended, palm up, supported by a pillow or armrest. Never draw blood from a standing patient — if they faint, you want them already low to the ground.
Step five is the tourniquet. Apply it 3 to 4 inches above the intended puncture site, snug enough to occlude venous return but not so tight you cut off arterial flow. The maximum application time is 60 seconds — anything longer triggers hemoconcentration that skews potassium, hematocrit, and a dozen other analytes. If you cannot find a vein in 60 seconds, release the tourniquet for two minutes and try again. Many new phlebotomists keep the tourniquet on for 90 seconds out of stress; that single bad habit ruins more samples than any other beginner mistake.
Step six is vein selection. The median cubital vein is the first choice because it sits centrally in the antecubital fossa, is well-anchored by surrounding tissue, and is rarely near the brachial artery or median nerve. The cephalic vein on the lateral (thumb-side) arm is the second choice — accessible but rolls more easily. The basilic vein is the last resort because it runs close to the brachial artery and median nerve; sticking it blind is how nerve injuries happen.
Palpate, do not just look. Veins that visibly bulge but feel hard or cord-like are sclerosed and will not yield blood. Step seven: disinfect with a 70% isopropyl alcohol pad in a concentric circle from the puncture site outward, never back over the cleaned area. Let it air-dry for a full 30 seconds — wet alcohol causes a stinging burn and can hemolyze the sample as it enters the tube.
Procedure Comparison
Adult standard. 15-30° angle bevel up into the median cubital vein. Multi-tube draws use evacuated system in order of draw.
Lancet into the lateral side of the third or fourth fingertip. Wipe first drop, collect into microtainers. Used for glucose, hemoglobin, point-of-care.
Neonates under 1 year. Lateral plantar surface only — never the arch or back of the heel. Pre-warm to increase blood flow.
Radial artery preferred after a positive modified Allen test. 90° angle for radial, 45° for brachial. Required for ABG analysis.
Step eight anchors the vein. Place your non-dominant thumb 1 to 2 inches below the puncture site and pull the skin taut downward. This stabilizes the vein so it does not roll when the needle pushes against it. Do not anchor with a finger above the puncture site — if the patient moves, you risk a needle-stick injury to yourself.
Step nine is the actual insertion. Hold the needle bevel up at a 15 to 30 degree angle to the skin, line up with the vein's long axis, and push in with steady forward motion. You will feel a slight pop as the bevel enters the vein lumen. Stop there. Pushing further drives the needle through the back wall and produces an instant hematoma.
Step ten: follow the order of draw. The CLSI sequence for evacuated tube systems is yellow blood culture bottles first, then light blue citrate for coagulation, then red or gold serum tubes with or without separator gel, then green heparin tubes, then lavender EDTA, then gray oxalate-fluoride.
Many programs teach the mnemonic 'Studious Boys Rarely Get Lousy Grades' — Studious for Sterile (yellow), Boys for Blue, Rarely for Red, Get for Green, Lousy for Lavender, Grades for Gray. The order exists to prevent additive carryover from one tube contaminating the next, which is exactly the kind of pre-analytic error that ruins coag panels and CBCs.

Tube Inversion Counts
Step eleven is tube inversion. As each tube fills and you exchange it for the next, gently invert it the recommended number of times to mix blood with the additive. Inversion means a complete 180-degree turn and back — not a shake, which causes hemolysis and ruins the chemistry panel.
Step twelve: remove the needle. Place gauze loosely over the puncture site, withdraw the needle in one smooth motion, then immediately activate the safety device before the needle leaves your hand. Apply firm pressure to the gauze for 3 to 5 minutes — longer if the patient is on warfarin, aspirin, or any anticoagulant.
Step thirteen is labeling. Every tube gets labeled at the bedside, before you leave the patient's room or before they leave the chair. The label must include the patient's full name, DOB, the date, the time of draw, your initials, and the MRN. Pre-printed labels from the lab system are ideal because they include the barcode and accession number.
Step fourteen: deliver to the lab. Some tubes go on ice (ammonia, lactic acid, ABG), some go in the dark (bilirubin), and most go at room temperature within 60 minutes. Document the draw time in the EHR before you move to the next patient. Skipping this step is what creates the legendary 'unlabeled tube of mystery blood' that nobody can identify hours later.
Order of Draw Tubes Explained
Sodium polyanethol sulfonate (SPS) anticoagulant inside sterile bottles. Drawn first to keep bottles sterile and prevent contamination from non-sterile tubes downstream. Used for bacteremia and septicemia workups. Invert 8 times.
Capillary puncture is the go-to method when only a small volume is needed, when veins are inaccessible (burn patients, badly scarred forearms), or when point-of-care testing is the goal. The technique varies by patient age. For adults and older children, the lancet pierces the lateral side of the third or fourth fingertip — never the thumb (calluses and the median nerve), never the fifth finger (too thin), and never the center of the pad (more painful, deeper bone). The puncture goes perpendicular to the fingerprint ridges so the blood beads up rather than running into the grooves.
Wipe the first drop of blood away with sterile gauze. The first drop contains tissue fluid that dilutes the sample and will skew glucose and electrolyte readings. Collect subsequent drops into the appropriate microtainer or capillary tube, avoiding scooping or scraping which causes hemolysis. The order of draw for capillary collection is different from venipuncture: blood gases first if needed, then EDTA (lavender microtainer), then other additive tubes, then serum tubes last. EDTA goes early in capillary draws because cell-count accuracy matters most and the small volume clots fast.
For infants under one year, heel stick replaces finger stick because pediatric fingertips are too small and bone damage is a real risk.
The puncture site is restricted to the lateral plantar surface of the heel — specifically the medial and lateral edges of the planter heel, never the arch (risk of nerve damage) and never the back of the heel (risk of calcaneal osteomyelitis). Pre-warm the heel for 3 to 5 minutes with a commercial heel warmer or a warm cloth to dilate the capillary bed and improve blood flow. The lancet depth must be no more than 2.0 mm in newborns to avoid hitting the calcaneus.
Pediatric heel stick is one of the highest-litigation procedures in phlebotomy. Stay out of the arch — the plantar artery and nerve run through it and a deep puncture causes permanent damage. Stay off the back of the heel — calcaneal bone is right under the skin and osteomyelitis from a contaminated stick has been documented. Use only spring-loaded incision devices designed for neonatal depth, never adult lancets. Document the site, depth setting, and pre-warming. If the baby has been stuck multiple times, alternate heels and rotate sites within the safe zone.
Arterial puncture is the most technically demanding draw because arteries bleed harder, pulsate, and sit deeper than veins. Most phlebotomists never perform arterial sticks — respiratory therapists and nurses with additional training own that procedure in most facilities. But the exam will test you on the basics. The radial artery at the wrist is the standard site because it has good collateral flow from the ulnar artery, sits superficially, and is easy to compress against the underlying radius bone for hemostasis. The brachial artery in the antecubital fossa is the second choice; the femoral is used only in code situations.
Before any radial stick, perform a modified Allen test to confirm collateral circulation. Have the patient make a fist while you compress both the radial and ulnar arteries. Release the ulnar artery only — the hand should pink up within 5 to 15 seconds. If the hand stays pale longer than 15 seconds, the ulnar collateral is inadequate and the radial artery must not be used. A negative Allen test forces you to switch to the other wrist or escalate to a brachial stick.
Insert the needle at a 90-degree angle for the radial artery (it sits just under the skin), 45 degrees for brachial, or 30 degrees for femoral. Arterial blood will flow into the heparinized syringe under its own pressure — no plunger pull needed.
Once the syringe fills, withdraw the needle and apply firm pressure to the puncture site for a full 5 minutes, longer for anticoagulated patients. Failure to compress adequately produces a brisk arterial hematoma that can compromise hand circulation. Cap the syringe immediately to exclude air and place it on ice for delivery to the blood gas analyzer within 15 minutes.

Venipuncture Procedure Checklist
- ✓Verify the order, confirm tests, and check special handling requirements
- ✓Gather all supplies before touching the patient — tubes in correct order, needle, holder, tourniquet, alcohol, gauze, tape, sharps, gloves
- ✓Identify the patient with two independent identifiers and match to the requisition
- ✓Hand hygiene followed by gloves before any patient contact
- ✓Position the patient seated or supine, arm extended palm up
- ✓Apply tourniquet 3 to 4 inches above puncture site, never longer than 60 seconds
- ✓Palpate and select the median cubital vein when available
- ✓Disinfect with 70% alcohol in concentric circles outward, allow 30 seconds to dry
- ✓Anchor the vein with the non-dominant thumb 1 to 2 inches below the site
- ✓Insert needle bevel up at 15 to 30 degree angle, stop when you feel the pop
- ✓Engage tubes in correct order of draw, invert each per manufacturer specification
- ✓Remove needle, activate safety device, apply pressure 3 to 5 minutes
- ✓Label tubes at the bedside with name, DOB, date, time, initials, MRN
- ✓Document the draw and deliver tubes to the lab per handling requirements
Complications happen even with perfect technique, and your job is to recognize them early and respond correctly. Hematoma is the most common — a bruise from blood leaking out of the vein into the surrounding tissue. Causes include going through the back wall of the vein, not applying enough post-draw pressure, or the patient bending the arm at the elbow. Prevent it with steady forward needle motion, firm pressure for 3 to 5 minutes, and a clear instruction to the patient to keep the arm straight. Treat an active hematoma with immediate pressure and a cold pack.
Syncope — fainting — is the second most common. Some patients feel fine until the moment they don't. Watch for pallor, sweating, yawning, or 'I feel weird' statements. If the patient says any of these, immediately release the tourniquet, remove the needle, and lower the head between the knees or recline them flat. Do not leave a vasovagal patient alone — they can fall off the chair and hit their head. Cold compresses to the forehead and ammonia inhalants (where permitted) can shorten recovery.
Nerve damage is rare but devastating. The basilic vein and the brachial artery sit close to the median nerve in the antecubital fossa. Patients with nerve injury feel sharp shooting pain, electric tingling, or numbness radiating into the hand. If they report any of these during the stick, withdraw the needle immediately. Document everything and notify the supervisor — these events trigger formal incident reports and can lead to lawsuits. The prevention is vein choice: median cubital first, cephalic second, basilic only when absolutely necessary and with the bevel angled away from the nerve.
Hemolysis — red blood cells rupturing in the tube — is the most common reason a lab rejects a sample. Causes include wet alcohol at the puncture site, vigorous tube shaking instead of gentle inversion, using a needle too small for the tube, drawing through a hematoma, or excessive vacuum pull from a partially-engaged tube. Hemolysis ruins potassium, LDH, magnesium, and AST results. The cure is technique: dry alcohol, gentle inversions, the right gauge needle (21 gauge is standard for adults), and never drawing through a swollen site.
Contaminated blood cultures are the last complication worth flagging. A positive culture growing skin flora (coagulase-negative Staph, Bacillus, Corynebacterium) is often a false alarm caused by inadequate skin prep. The CDC standard for blood culture skin prep is chlorhexidine gluconate scrubbed for 30 seconds and allowed to dry for another 30. Cutting the dry time produces contamination rates that average 3% across U.S. hospitals — a number associated with $5,000 per false-positive in extra workup costs.
Common Phlebotomy Complications
Blood leaks from vein into tissue. Cause: through-and-through stick or weak post-draw pressure. Fix: 3-5 min firm pressure, arm straight.
Vasovagal fainting. Warning signs: pallor, sweating, yawning. Action: release tourniquet, remove needle, recline patient, do not leave alone.
Sharp shooting pain or numbness into hand during stick. Cause: basilic vein near median nerve. Action: withdraw needle immediately, document, report.
Red cells rupture in tube. Causes: wet alcohol, vigorous shaking, wrong gauge needle. Result: rejected sample for K+, LDH, AST.
Skin flora grow in blood culture bottles. Cause: insufficient chlorhexidine dry time. Result: 3% false positive rate nationally.
Venipuncture vs Capillary Puncture
- +Venipuncture yields larger volumes for full chemistry panels
- +Venipuncture is more accurate for analytes affected by tissue fluid
- +Single venipuncture supports multiple tubes and tests at once
- +Vein draws are less painful for most adults than repeated finger sticks
- +Standard procedure with well-established CLSI guidelines
- −Venipuncture risks nerve injury and arterial puncture in the antecubital
- −Difficult on obese, dehydrated, or elderly patients with fragile veins
- −Requires a fully cooperative patient — not always available in pediatrics
- −Cannot be performed near IV sites, fistulas, or mastectomy-side arms
- −Higher infection risk than capillary in some settings
CLSI — the Clinical and Laboratory Standards Institute — publishes the documents that define correct phlebotomy practice in the United States. The two you must know are GP41 (collection of diagnostic venous blood specimens) and GP42 (collection of capillary blood specimens). These standards are the source for the order of draw, the tourniquet time limit, the angle of insertion, the inversion counts, and the labeling requirements you have read above. Every hospital lab procedure manual ultimately traces back to them. Exam questions that ask 'according to CLSI standards…' are pulling from these documents.
Beyond CLSI, OSHA's Bloodborne Pathogens Standard (29 CFR 1910.1030) governs needle safety, sharps disposal, and post-exposure protocols. You must activate the safety device on every needle, dispose in a puncture-resistant container within arm's reach, and report any needle-stick injury immediately for source-patient testing and post-exposure prophylaxis evaluation. The Needlestick Safety and Prevention Act of 2000 made safety-engineered devices mandatory — non-safety needles are a written citation in any inspection.
Beyond standards, your facility has its own protocols that may be stricter than CLSI. Some hospitals require double-glove technique for known HIV or hepatitis C patients. Some require face shields for arterial sticks. Some mandate witnessed labeling for blood bank specimens, where a second staff member confirms the tube label against the wristband before it leaves the room. Read your facility's policy and procedure manual on your first day — never assume CLSI alone covers everything.
For certification, the National Healthcareer Association (NHA) Certified Phlebotomy Technician (CPT) exam, the American Society for Clinical Pathology (ASCP) Phlebotomy Technician exam, and the NCCT National Certified Phlebotomy Technician exam are the three big credentials. All three test the procedures covered here, but they weight the topics differently. NHA leans heavily on order of draw and tube selection. ASCP weights physiology and lab math more. NCCT spreads questions across all domains. Pick the credential your employer reimburses or recognizes and study the matching phlebotomy tube colors reference chart for that exam.
Phlebotomy Practice Test Questions and Answers
Phlebotomy procedures look simple from the outside and are surprisingly demanding once you are the one holding the needle. Patient identification, vein selection, the tourniquet clock, the order of draw, inversion counts, post-stick pressure — every step has a reason rooted in either patient safety, lab accuracy, or both. Master them in the order this article presents and you will pass any phlebotomy certification exam and, more importantly, do right by every patient who sits in your chair.
The single best preparation strategy is repetition with feedback. Read a procedure, do the procedure, get corrected on the procedure, then read again. Static study alone leaves gaps that only show up when an arm rolls or a patient faints. Pair this guide with hands-on lab time, mock draws on practice arms, and timed practice tests that mimic the exam interface. If you are studying solo, run through the venipuncture checklist out loud while pretending to perform each step — kinesthetic recall sticks better than visual alone.
Once you are certified, the learning does not stop. Lab medicine evolves, tube manufacturers change additive formulations, and new tests come online with their own collection quirks. Stay current with the CLSI updates that come out every few years, attend in-services when your facility offers them, and read the manufacturer inserts on any new tube your lab adopts. The phlebotomists who keep learning after certification are the ones who become the lead techs and the trainers — and the ones who never end up on the wrong side of a labeling error.
Most of all, remember that the patient on the other end of the needle is rarely having a good day. They are anxious, often in pain, sometimes scared of what the results will show. Take an extra ten seconds to introduce yourself, explain what you are about to do, and tell them when to expect the brief sting. The clinical procedure is the same whether you say nothing or whether you reassure them — but the experience is completely different. That five-second human moment is what separates a good phlebotomist from a great one.
About the Author
Registered Nurse & Healthcare Educator
Johns Hopkins University School of NursingDr. Sarah Mitchell is a board-certified registered nurse with over 15 years of clinical and academic experience. She completed her PhD in Nursing Science at Johns Hopkins University and has taught NCLEX preparation and clinical skills courses for nursing students across the United States. Her research focuses on evidence-based exam preparation strategies for healthcare certification candidates.