MRI Cervical Spine: What to Expect, Cost, and CPT Codes
MRI cervical spine guide: 25-45 minute scan, CPT codes 72141 and 72142, cost ranges, contrast use, sequences, and what your report means.
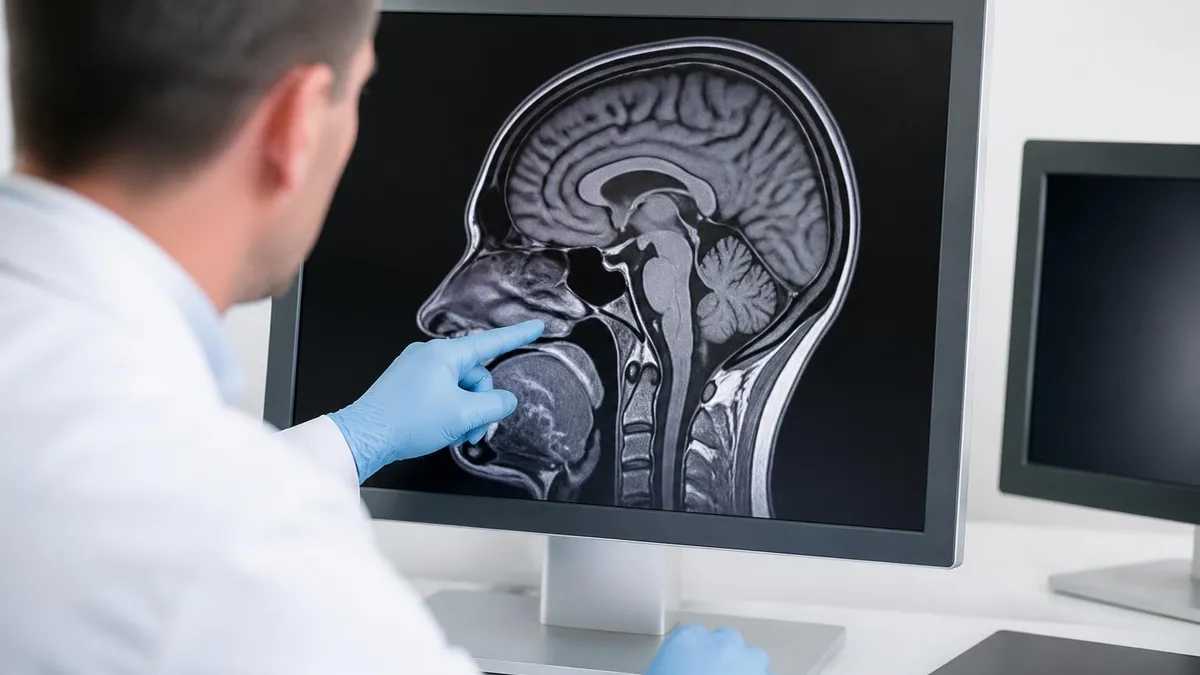
An MRI cervical spine scan creates detailed pictures of the seven vertebrae at the top of your spine, plus the spinal cord, nerve roots, and surrounding soft tissues. It is the imaging test most often ordered when a patient has neck pain, arm numbness, weakness in the hands, or after a fall or whiplash injury. Unlike X-rays or CT scans, MRI uses no radiation. The machine uses a strong magnet and radio waves to produce slice-by-slice images of the cervical region (the C1 through C7 vertebrae and the C7-T1 junction).
If your doctor has ordered this scan, you probably have questions. How long will you be in the tube? Will you need contrast? What does the report mean? This guide walks you through it. We cover what the scan looks at, how the appointment runs from check-in to discharge, common findings on a cervical spine MRI report, and the CPT billing codes that show up on your bill.
For technologists studying for certification, this article doubles as a clinical refresher. The protocols, sequences, and patient-positioning notes follow ARRT and ARMRIT exam blueprints. If you want to test your knowledge, jump to the MRI practice test hub and try a few question sets after reading.
MRI Cervical Spine at a Glance
The cervical spine region runs from the base of your skull to where your neck meets your upper back. Inside this small column sit some of the most important structures in the body: the spinal cord (the highway for nerve signals between brain and body), eight pairs of cervical nerve roots, and the discs that cushion each vertebra. When something compresses or damages any of these structures, symptoms can show up anywhere from your shoulders to your fingertips.
A neck MRI shows all of this in remarkable detail. Radiologists look at vertebral alignment, the height and signal of each disc, the size of the spinal canal, the foramina (the small openings nerves pass through), and the soft tissues around the spine. Herniated discs, bulging discs, bone spurs, spinal stenosis, tumors, infections, and ligament tears all show up. The scan also picks up multiple sclerosis lesions on the cord, syringomyelia (fluid cavities in the cord itself), and post-traumatic changes after a car crash or sports impact.
Doctors order this scan for a wide range of complaints. Persistent neck pain that has not responded to four to six weeks of conservative treatment is a common reason. So is arm pain that follows a dermatomal pattern, tingling or numbness in the fingers, weakness in the hands or arms, gait changes, or neck pain after trauma. Surgeons need an MRI before any planned cervical spine surgery to map exactly which level is affected.
This scan is most often ordered for neck pain lasting longer than 4-6 weeks, arm pain or tingling in a dermatomal pattern, hand weakness, gait changes suggesting cord involvement, after trauma (whiplash, fall, sports impact), pre-operative planning for cervical surgery, or suspected MS, tumor, or infection. If your symptoms started after a recent injury or are getting worse, mention this when scheduling.
Booking a cervical spine MRI is straightforward, but a little preparation makes the day go smoothly. First, the imaging center calls to confirm your appointment and screen you for safety. You will be asked about any metal implants, pacemakers, cochlear implants, aneurysm clips, shrapnel, or recent surgery. Some implants are MRI conditional (safe under specific scanner conditions); others are absolute contraindications. This is the most important step in the whole process.
Most cervical spine scans need no special prep. You can eat, drink, and take your usual medications. The exception is if your doctor ordered the scan with contrast. In that case, you may be asked to drink fluids beforehand, and you will need a recent kidney function blood test (eGFR) if you have diabetes, kidney disease, or are over 60. Wear comfortable clothing with no metal: no zippers, snaps, underwire bras, or sequined fabrics.
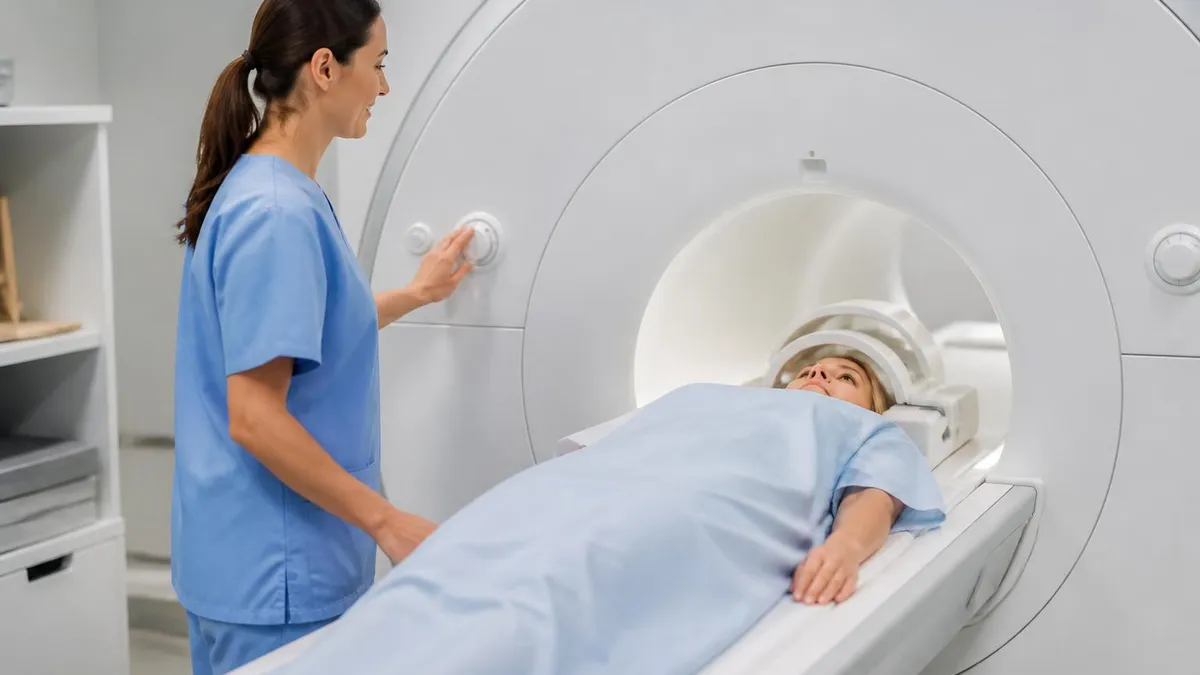
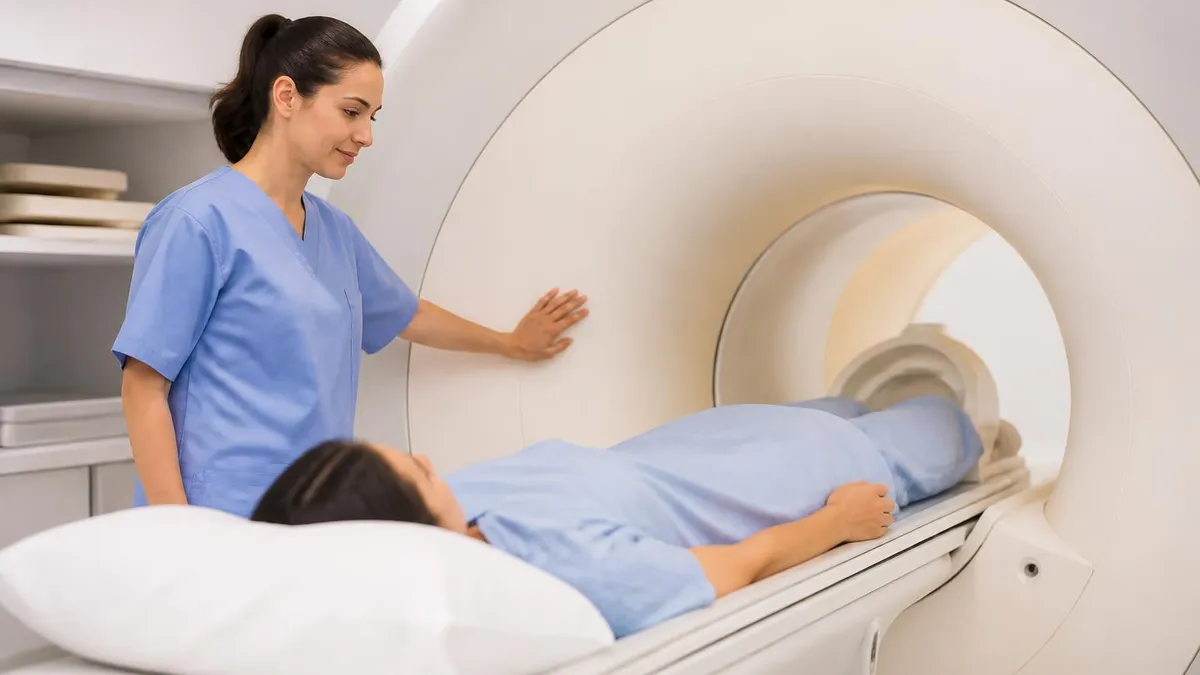
When you arrive, you complete a safety questionnaire (again, in detail), and a technologist reviews it with you. You then change, store your belongings in a locker, and walk into the scan room. The cervical spine coil looks like a small saddle or pad that sits behind your neck and shoulders. You lie on your back, head resting in a soft cradle. The technologist gives you hearing protection (the scan is loud, around 100 decibels) and a squeeze ball you can press if you need to stop the scan.
Tell the imaging center about every implant, surgery, and metal exposure you can think of: pacemakers, defibrillators, cochlear implants, aneurysm clips, neurostimulators, insulin pumps, metal fragments in your eye from welding or grinding, recent surgery within the last six weeks, and any tattoos done with metallic ink. Some implants are absolutely unsafe in the MRI environment.
The cervical spine MRI typically takes 25 to 45 minutes from the time you enter the room to the time you leave. The actual scanning takes 20 to 35 minutes, depending on the protocol. Most facilities run between five and eight sequences. Each one looks different on the image and highlights different tissues. A standard non-contrast cervical spine MRI usually includes a sagittal T1, sagittal T2, sagittal STIR (or T2 fat-saturated), axial T2, and axial gradient-echo.
If your doctor ordered the scan with contrast, the technologist will start an IV in your arm partway through. The contrast agent, called gadolinium, is injected over about 30 seconds, then the technologist runs an additional set of T1 fat-saturated sequences. Contrast helps spot infections, tumors, post-surgical scar tissue versus recurrent disc material, and any active inflammation.
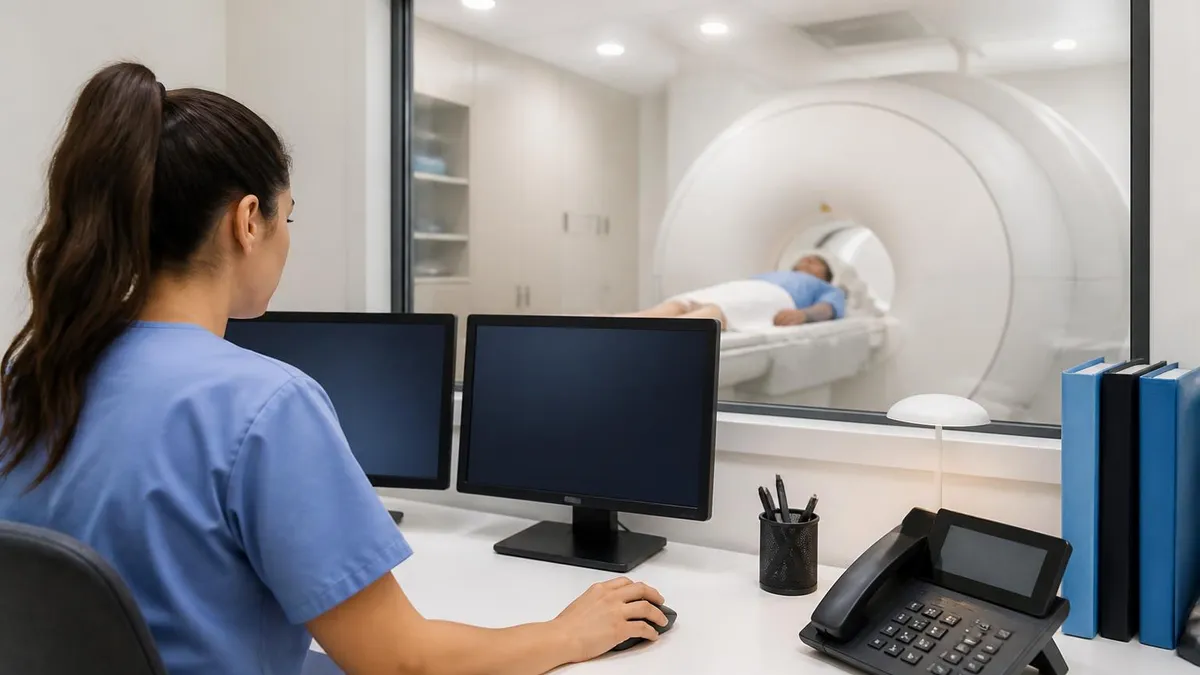
During the scan, your job is to lie completely still. Even small movements can blur the images. The machine makes loud knocking, buzzing, and humming sounds. Each sequence runs for 2 to 5 minutes, and between sequences there is a short pause. Many centers offer music through MRI-safe headphones. If you start to feel anxious, squeeze the ball and the technologist pauses the scan. You will not be left alone, but the technologist sits behind a glass window.
Sequences Used in a Cervical Spine Protocol
Shows vertebral body marrow signal, fat, and overall anatomy. Discs appear dark.
Lights up CSF and inflammation. Best view of disc hydration and cord signal.
Fat-suppressed sequence for spotting marrow edema, fractures, infection.
Cross-sections at each disc level. Shows canal, foramina, cord, nerve roots.
Only if contrast is used. Highlights tumors, infection, post-surgical scar.
Quick three-plane scout used to plan all other sequences.
After the last sequence, the technologist pulls you out of the bore, removes the coil, and helps you sit up slowly. You are free to drive and resume normal activities right away. If you received gadolinium contrast, you will be asked to drink extra fluids for the next day. The technologist sends the images to a radiologist, who then writes a formal report. This usually takes 24 to 48 hours.
The report describes alignment, vertebral body height and marrow signal, disc height, hydration, any disc bulges or herniations, the size of the central canal, the size of the neural foramina (left and right at each level), the appearance of the spinal cord, and any soft tissue findings. Common terms you will see include disc bulge, disc protrusion, disc extrusion, foraminal stenosis, central canal stenosis, facet arthropathy, uncovertebral hypertrophy, and cord signal abnormality.
Not every finding is clinically significant. Most adults over 40 show some level of degenerative change on an MRI even with no symptoms. Your doctor correlates the findings with your symptoms, exam, and other tests. Treatment depends on what is found and how it lines up with what you feel.
Contrast Versus Non-Contrast Protocols
The standard scan for routine neck pain, suspected disc herniation, or degenerative changes. CPT code 72141. Most insurance plans cover this when conservative treatment has failed for at least 4-6 weeks. Total time: about 25-35 minutes.
Insurance, billing, and out-of-pocket cost is one of the most common questions patients ask. The price of a cervical spine MRI in the United States ranges enormously, from under $400 at an outpatient imaging center to over $3,500 at a hospital outpatient department. Without insurance, expect to pay $700 to $2,500 depending on your region and whether contrast is used.
The bill will list one or more CPT codes. CPT (Current Procedural Terminology) codes are five-digit numbers that describe the exact service performed. For cervical spine MRI the codes are: 72141 for MRI cervical spine without contrast, 72142 for MRI cervical spine with contrast, and 72156 for MRI cervical spine without and with contrast. The without and with code is used when the protocol includes both pre-contrast and post-contrast imaging.
To save money, call ahead. Outpatient imaging centers are typically half the price of hospital-affiliated facilities. Get an itemized estimate before scheduling. Ask whether your insurance requires prior authorization, and if so, make sure the imaging center has approval on file before your appointment. If you do not have insurance, ask about a cash-pay rate, which is often significantly less than the chargemaster price.
Day-of-Scan Checklist
- ✓Arrive 15-30 minutes early to complete final paperwork
- ✓Wear comfortable clothing with no metal (zippers, snaps, underwire, sequins)
- ✓Bring your insurance card and a list of your medications
- ✓Bring implant cards for any pacemaker, stent, or surgical hardware
- ✓Eat and drink normally unless told otherwise (sedation or contrast may change this)
- ✓Leave jewelry, watches, hearing aids, and credit cards at home or in the locker
- ✓Use the bathroom before the scan starts
- ✓Tell the technologist if you are pregnant or might be pregnant
- ✓Mention any history of claustrophobia or anxiety
Plenty of people are nervous about being in the tube. The cervical spine scan is one of the easier MRI exams because your head does not have to go all the way in. Even so, if you have a history of claustrophobia or panic in tight spaces, talk to your doctor before the appointment. Options include a mild oral sedative taken about an hour before the scan, an open MRI machine, or a wide-bore scanner. Open MRI machines have lower magnet strength, so image quality is slightly lower, but for many indications they are perfectly adequate.
Wide-bore scanners have a 70-centimeter opening (versus the standard 60 cm), which feels noticeably more spacious without losing image quality. Most newer imaging centers offer wide-bore as standard. If a sedative is prescribed, you will need a driver. Some patients find that a sleep mask, deep breathing, or a hand on the squeeze ball is enough. Tell the technologist about your anxiety. They have seen it before.
Looking at the cervical region anatomically, the seven vertebrae are labeled C1 through C7 from top to bottom. The first two have specialized shapes. C1 (the atlas) is a ring-shaped bone that supports the skull. C2 (the axis) has a peg called the dens that fits up into C1, allowing rotation. C3 through C7 look more typical, each with a body in front, a spinous process at the back, and lateral processes on each side. The cervical discs sit between each adjacent pair (C2-C3, C3-C4, and so on down to C7-T1).
The spinal cord runs through the canal formed by the vertebrae. In the cervical region, the cord is its widest, with cervical enlargement between roughly C4 and T1. Eight pairs of cervical nerve roots leave the canal through small windows called neural foramina. C1 exits above the atlas. C2 through C7 exit above the vertebra of the same number. C8 exits between C7 and T1. After that, the numbering swaps and the pattern continues for the rest of the spine.
Understanding this anatomy helps when reading the report. If the report says C5-C6 right paracentral disc herniation with right C6 nerve root impingement, it is describing a disc between the fifth and sixth vertebrae that is pushing into the canal on the right side and squeezing the C6 nerve root. The C6 nerve serves the thumb, biceps muscle, and a strip of skin on the lateral forearm.
MRI vs Other Imaging Options
- +No ionizing radiation (safer than CT for repeat imaging)
- +Excellent soft tissue detail: discs, ligaments, cord, nerves
- +Detects MS, tumor, and infection that CT misses
- +Useful in pediatric patients and women of childbearing age
- −Longer scan time than CT (25-45 minutes versus a few minutes)
- −Loud sounds may bother some patients
- −Cannot be performed on patients with certain implants
- −More expensive than CT or X-ray
- −Tight space can trigger claustrophobia
For MRI technologists, the cervical spine is one of the most-performed exams. Patient positioning is critical. The patient lies supine, head in a neutral position with a small pad under the knees for comfort. The cervical coil (a phased-array surface coil) sits around the neck. You instruct the patient to swallow before the scan begins and avoid swallowing during sequences if possible. Foam pads on each side of the head reduce motion. The center of the coil should align with the cricoid cartilage, which corresponds roughly to the C5-C6 level.
The sagittal localizer is the first sequence and shows the cord and all seven vertebrae plus part of the upper thoracic spine. Sagittal T1 highlights vertebral body marrow and fat. Sagittal T2 lights up CSF and any inflammation. STIR or T2 fat-sat is excellent for detecting marrow edema from fractures or infection. Axial sequences are angled to the disc spaces and run at each level.
Common artifacts on cervical scans include CSF flow artifact, motion artifact from swallowing or breathing, and dental hardware causing distortion at the upper cervical levels. Use saturation bands anteriorly to reduce swallowing artifact. For patients with metallic dental implants, switching to STIR instead of fat-sat T2 helps because STIR is less sensitive to field inhomogeneity.
Position the cervical coil center at the cricoid cartilage (about C5-C6). Use anterior saturation bands to suppress swallowing artifact. For patients with extensive dental hardware, prefer STIR over fat-sat T2 at the upper cervical levels because STIR is less affected by field inhomogeneity. Always confirm patient comfort before starting; subtle restlessness produces images that have to be repeated.
If you are preparing to become an MRI technologist or studying for the ARRT MRI registry or ARMRIT exam, the cervical spine exam shows up on every test in some form. You will be asked about coil selection, sequence parameters, contrast indications, safety screening, and how to handle common artifacts. The MRI practice test series on this site has dedicated question sets on spine imaging, contrast agents, safety, and pulse sequences.
For working technologists, continuing education matters. The ARRT requires 24 continuing education credits every two years to maintain registry. Many of these can be earned online through approved providers. Staying current on safety guidelines and protocol updates is part of the job.
The cervical spine MRI is a workhorse exam. It is performed millions of times every year in the United States. Whether you are a patient preparing for your first scan, a technologist refining your protocol, or a student preparing for a certification exam, knowing the anatomy, indications, sequences, and findings turns a confusing experience into a confident one.
One last note on follow-up. If your radiologist's report shows a finding that needs urgent attention (cord compression with myelopathy, fracture, infection, tumor), your ordering doctor will contact you, often the same day. For routine findings, you typically have a scheduled follow-up appointment to discuss results. Bring a list of your symptoms, when they started, what makes them worse, and what treatments you have already tried.
Remember that imaging is just one piece of the puzzle. Your symptoms, physical exam, and response to conservative care all matter. A scary-sounding finding on the report may turn out to be incidental, while a normal MRI does not always mean there is nothing wrong; some conditions take time to show up on imaging. Trust the process, follow up with your doctor, write down questions ahead of each visit, and keep asking until you understand exactly what the next step looks like for your situation.
MRI Questions and Answers
About the Author
Attorney & Bar Exam Preparation Specialist
Yale Law SchoolJames R. Hargrove is a practicing attorney and legal educator with a Juris Doctor from Yale Law School and an LLM in Constitutional Law. With over a decade of experience coaching bar exam candidates across multiple jurisdictions, he specializes in MBE strategy, state-specific essay preparation, and multistate performance test techniques.