
Flammable Products WHMIS: Hazard Classes, Symbols, and Study Guide for the AIX Safety WHMIS 2015 Course
🎯 Learn flammable products whmis rules, hazard classes, flame symbols, labels and SDS basics, with study help for the AIX Safety WHMIS 2015 course and quiz.
Searching for whmis 2015 aix safety v3 quiz answers usually means one thing: you have a course deadline and a test full of questions about flame symbols, labels, and storage. This guide explains flammable products whmis rules in plain language, so you understand the reasoning behind each answer instead of memorizing a key. Whether you are a warehouse associate, a lab technician, or a new hire at a US facility with Canadian supply chains, the same logic applies to every question.
If you have ever asked what does whmis stand for, the answer is Workplace Hazardous Materials Information System. Created in Canada in 1988 and updated in 2015 to align with the Globally Harmonized System, it gives workers three tools: standardized labels, safety data sheets, and training. The whmis meaning is practical. If a product can burn, explode, poison, or corrode, the people handling it have a legal right to know how before an accident happens.
Flammable products sit at the center of that system because fire is among the most common and costly workplace hazards. Under WHMIS 2015, flammability is not a single label. It is a family of physical hazard classes that includes flammable gases, flammable aerosols, flammable liquids, flammable solids, pyrophoric materials, self-heating substances, and chemicals that release flammable gas when they touch water. Each class has its own categories, cutoffs, and precautionary statements, which is exactly what training courses test.
American readers often wonder why a Canadian system matters to them. The reason is trade. Products shipped from Ontario or Alberta to a plant in Michigan or Texas arrive with WHMIS-style labels, and many US employers run mixed workplaces. OSHA's Hazard Communication Standard, 29 CFR 1910.1200, was also revised to follow the same GHS framework, so the flame pictogram, signal words, and sixteen-section safety data sheet look nearly identical on both sides of the border.
The AIX Safety WHMIS 2015 course, which many employers assign through online training portals, is built around this framework. Learners move through modules on hazard classes, pictograms, supplier and workplace labels, safety data sheets, and safe handling, then complete a short assessment. People searching for aix safety whmis 2015 answers are typically stuck on a handful of items about flash points and flame symbols. Understanding the underlying rules beats copying answers, because question order and wording change between course versions.
This article walks through the flammable product classes one at a time. You will see the exact flash point thresholds that separate Category 1 from Category 4 liquids, which pictograms appear on each, what signal words mean, and how storage and ignition source control follow from the classification. We also cover the label and SDS details that exam writers love, such as Section 2 hazard identification and Section 9 physical properties, so you can answer confidently without guessing.
Use the table of contents to jump around, and take the free practice questions linked throughout. A good study rhythm is short and repeated: read one section, answer ten questions, review what you missed, and return the next day. Most learners who follow that routine for three or four sessions are ready for their final assessment. Keep in mind that your workplace-specific procedures, which your employer must teach separately, are as important as the general course content.
Flammable Products in WHMIS by the Numbers
Types of Flammable Products Under WHMIS 2015
Divided into four categories by flash point and initial boiling point. Gasoline, acetone, xylene, and diesel fuel are common examples. Categories 1 and 2 carry the Danger signal word, while Category 3 uses Warning with the flame pictogram.
Propane, hydrogen, acetylene, and spray cans with flammable propellants. Gases are stored under pressure, so labels often show both the flame and gas cylinder pictograms. Leaks collect in low areas and ignite from tiny sparks.
Materials such as magnesium shavings, sulfur, and certain metal powders that ignite easily and burn quickly. Classification depends on burning rate tests. Dust clouds from these solids can also create combustible dust hazards in processing areas.
Pyrophoric materials ignite on contact with air, and water-reactive substances release flammable gas when wet. White phosphorus, sodium metal, and calcium carbide are examples. They need special storage, such as under oil or inert gas.
Classification is the foundation of everything else in WHMIS. A supplier tests or evaluates a product, compares the results with criteria in the Hazardous Products Regulations, and assigns every applicable hazard class and category. Only then can the label, pictograms, and safety data sheet be written. For flammable products, the deciding numbers are physical properties: flash point, boiling point, flammability range, ignition behavior, and how fast a solid burns. Workers do not run these tests, but they must understand what the results mean.
The formal definition of whmis hazard groups divides everything into physical hazards and health hazards. Flammable products fall almost entirely in the physical group. Within it, the flammability family includes flammable gases, aerosols, liquids, and solids, plus pyrophoric liquids, solids, and gases, self-heating substances, and substances that emit flammable gases on contact with water. Each class receives a category number, and a lower number generally means greater danger, with Category 1 representing the most severe.
Flammable liquids are the class learners meet most often, and the categories are tied to flash point, the lowest temperature at which vapors ignite near an ignition source. Category 1 liquids have a flash point below 23°C (73°F) and an initial boiling point of 35°C (95°F) or less. Category 2 also flashes below 23°C but boils above 35°C. Category 3 flashes from 23°C to 60°C, and Category 4 from above 60°C up to 93°C (200°F).
Examples make those numbers real. Diethyl ether, with a flash point near minus 45°C, is Category 1. Acetone is Category 2, and gasoline is typically Category 1 because of its low initial boiling point. Xylene, which flashes around 27°C, is Category 3, as are many paint thinners. Diesel fuel lands in Category 3 or 4 depending on the blend. A frequent exam trap is assuming that a high flash point means a liquid is safe. It only means the liquid needs more heat.
Flammable gases follow a different logic. Category 1 gases ignite at standard pressure when mixed with air at 13 percent or less by volume, or have a flammable range of at least 12 percentage points regardless of the lower limit. Propane, hydrogen, acetylene, and methane are familiar examples. Category 2 covers other flammable gases. Because they are stored under pressure, many carry two pictograms: the flame and the gas cylinder. Aerosols add another factor, since propellant content and heat of combustion determine their category.
Flammable solids, such as magnesium powder, sulfur, and some metal shavings, are classified by burning rate tests. Pyrophoric gases ignite spontaneously in air at or below 54°C (130°F), while pyrophoric liquids and solids ignite within five minutes of air contact, which is why white phosphorus is stored under water. Self-heating substances warm up in air without an external energy supply, and water-reactive substances, like sodium or calcium carbide, release flammable gas when wet. All of these classes show the flame pictogram.
Oxidizers deserve separate attention because they are often confused with flammables. Oxidizing gases, liquids, and solids do not necessarily burn themselves, but they feed fires by supplying oxygen. Their pictogram is a flame over a circle, and their safety data sheets warn against storing them next to flammable products. Organic peroxides combine fuel and oxidizer in one molecule and use the flame or exploding bomb symbol depending on type. Remembering this difference helps with matching questions on most tests.
WHMIS Symbols: Reading Flammable Product Labels
The flame pictogram is a black flame inside a red diamond border on a white background. Under WHMIS symbols rules, it appears on flammable gases, aerosols, liquids, and solids, as well as pyrophoric, self-heating, and water-reactive materials, and on certain self-reactive substances and organic peroxides. Seeing it tells you to keep ignition sources away: open flames, sparks, hot surfaces, static discharge, and in some areas even unrated electrical devices.
Signal words complete the message. Danger marks the more severe categories, usually Category 1 and 2 flammable liquids, while Warning marks Category 3 liquids. Category 4 liquids use Warning without the flame symbol. Hazard statements are fixed phrases such as Extremely flammable liquid and vapour or Flammable liquid and vapour. Exam questions often ask which signal word fits a given flash point, so tie each category number to its word before test day.
Strict Flammable Product Rules: Benefits vs Challenges
- +Standard labels let workers recognize fire hazards in seconds
- +Clear flash point categories make storage decisions easier
- +Safety data sheets give firefighting and spill instructions in one place
- +Aligned US and Canadian rules reduce confusion at shared sites
- +Training lowers the odds of costly fires and insurance claims
- +Workers gain a legal right to know what they handle
- −Classification criteria can be hard to memorize at first
- −Workplace labeling adds routine paperwork for small shops
- −Storage cabinets and ventilation require upfront spending
- −Bilingual labeling in Canada can surprise US shippers
- −Refresher training takes time away from production
- −Differences between WHMIS and OSHA wording cause occasional confusion
Flammable Products WHMIS Safety Checklist
- ✓Read the supplier label before opening any container.
- ✓Check Section 2 of the SDS for the flammable category.
- ✓Confirm the signal word is Danger or Warning.
- ✓Remove open flames, sparks, and hot surfaces from the area.
- ✓Ground and bond containers during transfers.
- ✓Store flammable liquids in an approved safety cabinet.
- ✓Keep oxidizers separate from flammable products.
- ✓Label every secondary container with a workplace label.
- ✓Use only non-sparking tools around vapors.
- ✓Know where the nearest Class B extinguisher is located.
Flash point decides the category
If you remember one thing, remember that a lower flash point means a more dangerous liquid. Below 23°C is Category 1 or 2, 23°C to 60°C is Category 3, and above 60°C up to 93°C is Category 4. Boiling point only separates Category 1 from Category 2.
Fire needs three things: fuel, oxygen, and heat. Safe handling of flammable products is mostly about keeping those three apart. With flammable liquids, the fuel is not the liquid itself but its vapor, which forms above the surface and mixes with air. Most flammable vapors are heavier than air, with a vapor density above 1, so they flow along floors, into pits, and across rooms until they find a spark. That is why ignition control matters so much.
Storage is the first line of defense. In the US, OSHA 29 CFR 1910.106 and NFPA 30 limit how much flammable liquid can sit outside an approved cabinet. A single cabinet may hold up to 60 gallons of Category 1, 2, or 3 liquids, and the cabinet must carry the words Flammable, Keep Fire Away. Approved cabinets use double-wall steel construction with an air space, and doors that close firmly. Never store flammables in a regular cupboard or under stairways.
Static electricity is a quiet but serious ignition source. When liquid flows through a hose or pours from one container into another, it builds an electrical charge that can jump as a spark. Bonding connects two containers with a conductive wire so they share the same charge, and grounding connects them to earth. Use both when filling drums or large cans. Safety cans with flame arresters and self-closing lids further reduce the risk during small dispensing jobs.
Ventilation keeps vapor concentrations below the lower explosive limit, or LEL, the minimum concentration in air that can ignite. As a rule of thumb, confined space entry programs require readings under 10 percent of the LEL before work starts, and many sites alarm at 25 percent. Gas detectors should be calibrated and bump-tested before use. Hot work, such as welding or grinding, requires a permit and a fire watch whenever flammable materials are nearby, even if you believe the area is clear.
Segregation prevents small problems from turning into large ones. Keep oxidizers, such as nitric acid, hydrogen peroxide, and chlorates, away from flammable liquids by distance or by a noncombustible barrier. Water-reactive materials belong in dry, protected storage, not under sprinklers or beside sinks. Pyrophoric chemicals need their own area, often under inert gas. The safety data sheet, Section 7, tells you exactly which materials are incompatible, and it is the document to check first.
Spills should be handled quickly and calmly. First, remove ignition sources and alert nearby workers. Next, ventilate the area, put on the personal protective equipment listed in SDS Section 8, and stop the leak if you can do so safely. Use non-sparking tools and absorbent pads rated for solvents. Never wash a flammable spill into a floor drain, because vapors can travel through piping. Place used absorbents in a labeled, closed metal container for proper disposal.
Fire response training is part of any WHMIS program. Class B extinguishers handle flammable liquids and gases, while Class D extinguishers are needed for combustible metals such as magnesium. Use the PASS method: pull the pin, aim at the base, squeeze the handle, and sweep side to side. Only fight a fire that is small, with a clear exit behind you. Otherwise, activate the alarm, evacuate, and give responders the SDS for the products involved.
Completing an online course gives you general knowledge, but employers must still provide site-specific training on the products, procedures, and emergency plans at your workplace. Many employers do not accept a certificate from a previous job, so expect to retrain when you change employers.
If you must define whmis for a coworker, a short version works well: it is a hazard communication system that makes sure labels, safety data sheets, and worker education travel with every hazardous product. Those three pillars are linked. The label gives a quick warning, the SDS gives detail, and training teaches you how to use both. Test questions frequently ask which pillar fits a scenario, such as a new hire who cannot read a container's hazards.
A WHMIS certificate is the proof most people want after finishing an online course such as the AIX Safety WHMIS 2015 module. It usually shows your name, the course title, the completion date, and a score. No single federal expiry date applies, but many employers require refreshers every one to three years, and Canadian rules require training to be reviewed regularly. Keep a digital copy and give your supervisor a copy for your training file.
Safety data sheets follow a fixed sixteen-section format, and flammable products make some sections especially important. Section 1 identifies the product and supplier. Section 2 lists hazard classification, pictograms, and signal word. Section 3 covers composition. Section 4 gives first aid. Section 5 covers firefighting measures, including suitable extinguishing media. Section 6 explains accidental release, and Section 7 gives handling and storage advice. Section 9 contains the flash point and boiling point you need for category questions.
Sections 8 and 10 round out the flammable picture. Section 8 lists exposure controls and personal protective equipment, such as flame-resistant clothing, chemical splash goggles, and nitrile or neoprene gloves. Section 10 describes stability and reactivity, including incompatible materials and hazardous decomposition products like carbon monoxide. Sections 11 to 15 cover toxicology, ecology, disposal, transport, and regulations, and section 16 lists revision dates. If a question mentions the revision date or the preparer, the answer is section 16.
Employers carry the heaviest duties. They must make sure hazardous products are labeled, keep current safety data sheets accessible to workers during every shift, train workers, and review training when new hazards appear. Workers also have duties: follow safe work procedures, use protective equipment, report damaged labels, and ask questions when something is unclear. Supervisors sit in the middle, translating written procedures into daily habits. Exam writers love questions about who is responsible for which task.
Know the three basic worker rights, too. Workers have the right to know about the hazards of the products they use, the right to participate in health and safety activities, and the right to refuse unsafe work without punishment. In the US, similar rights come from OSHA's Hazard Communication Standard and Section 11(c) of the OSH Act. The details differ by jurisdiction, but the principle is the same everywhere: you should never be asked to handle an unknown flammable chemical blind.
Training must be specific. General WHMIS education covers hazard classes, pictograms, labels, and SDS reading, while workplace instruction covers the exact products on your site, how they are stored, which ventilation is used, and what to do in an emergency. For flammable products, that includes the location of safety cabinets, fire exits, eyewash stations, and spill kits. Ask for a walkthrough in your first week and write down the answers, because those details often appear on workplace quizzes.
The smartest way to prepare for any WHMIS assessment, including the AIX Safety WHMIS 2015 course, is to study concepts rather than hunt for aix safety whmis answers. Question pools are rotated and reworded, so a memorized answer for one version may be wrong on the next. When you know why a Category 2 liquid carries Danger, you can answer any variation. Spend your time on understanding the rules behind the questions, and the actual answers follow naturally.
Start with a one-page cheat sheet that you write yourself. Put the four flammable liquid categories in a small table with flash point ranges, signal words, and pictograms. Add a column for examples such as ether, acetone, xylene, and diesel. Writing it by hand forces recall, and recall is what the test measures. Review the sheet for five minutes each morning, and cover one column at a time to quiz yourself.
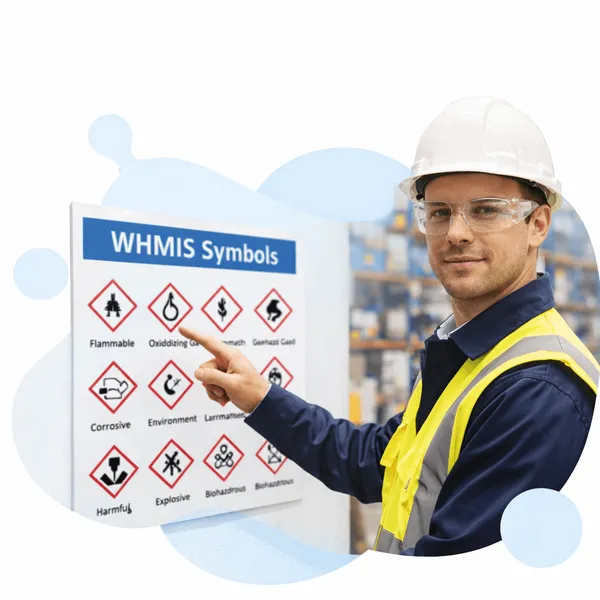
Next, practice with pictograms. Cut out the nine WHMIS pictograms, or draw them, and shuffle them like flashcards. For each one, say the hazard it represents, one example product, and the signal word typically used. The flame, flame over circle, exploding bomb, corrosion, gas cylinder, skull and crossbones, health hazard, exclamation mark, and biohazard symbols should all feel familiar. Learners who confuse the flame with the flame over circle often miss easy points.
Read a real safety data sheet before the test. Download one for a common flammable product, such as isopropyl alcohol or a paint thinner, and find the flash point, the signal word, the extinguishing media, and the storage guidance. Seeing the sixteen sections applied to a real product makes the abstract course material concrete. It also prepares you for scenario questions that describe a worker looking for a specific piece of information on an SDS.
When you take the course, work through the modules in order and use the built-in knowledge checks. Do not rush through the narrated slides, because assessment questions are often drawn directly from their wording. Take notes on definitions, numbers, and lists. If you wonder whmis what does it stand for or need other basics, do a quick review of the opening module before the final assessment, since early questions often cover simple terms.
Use practice quizzes in a smart cycle. Take one quiz cold to find your weak areas, review every wrong answer and read the explanation, then retake a different quiz a day later. Track your scores in a notebook. Aim for at least 85 percent on two quizzes in a row before the real assessment. If hazard classes keep tripping you up, return to the flash point table and the oxidizer versus flammable distinction.
On test day, find a quiet space, close extra browser tabs, and read each question twice. Watch for absolute words like always and never, which usually signal a wrong choice. Eliminate options that conflict with basic safety logic, such as storing oxidizers beside solvents. If your course allows retakes, treat a missed question as feedback instead of a failure. Afterward, save your certificate, send a copy to your employer, and set a reminder for your next refresher.
WHMIS Questions and Answers


How this page was made: written with AI tools and published by Nathan Beja, founder of Practice Test Geeks, who is responsible for its content. We have not yet matched this exam's facts to an official source, so confirm fees, dates and rules with the exam body. Not reviewed by a subject-matter expert. Editorial policy