Best Shed Plans Tips & Guide 2023
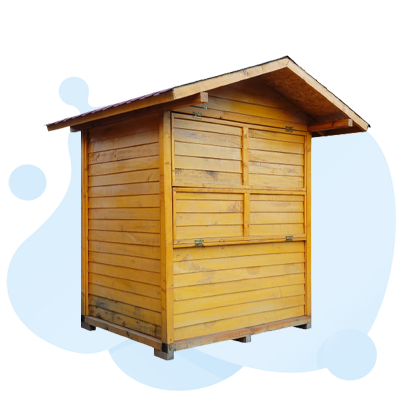
In a backyard or on an allotment, a shed is often a straightforward, single-story roofed building used for storage, hobbies, or as a workshop. Sheds used in agriculture or industry can be substantial buildings. The four primary styles of shed construction include all-wood construction, vinyl-sided shelters built over wooden frames, and metal sheathing over a metal frame. While larger permanent shelters could be constructed on a concrete pad or foundation, smaller ones might have a wooden or plastic floor. To prevent theft or entrance by children, domestic animals, wildlife, etc., sheds may be lockable.
When a home doesn’t have a garage, adding a backyard shed can enhance storage space for tools, seasonal items, or gardening supplies or add an extra area for hobbies. Additionally, sheds can be furnished and used to work on projects like woodworking, writing novels, or creating art. While the prefabricated buildings at the hardware store may be practical, building a shed on your own frequently saves money and offers more customizing options.
Building a shed should be enjoyable and leave you feeling accomplished and satisfied with what you’ve accomplished. A selection of shed plans is available to meet almost every type of aim, whether you desire an open inside or a tricked-out room loaded with storage and nooks. Choosing the best shed plans is the first step to a successful DIY shed. It is less expensive to build your own shed if you are debating between doing it yourself or hiring a builder for your backyard storage needs. The exact cost difference relies on local building labor costs. A competent builder will cost you money for both labor and supplies. If you decide to construct the shed yourself, your expenses will be limited to the cost of supplies and equipment.
Free Shed Plans Test Online
Top 10 Tips to Build Your Own Shed
Building a shed involves procedures that need prior approval before the actual building can start, so it’s no joke. You can either find a premade shed online and customize it later, depending on your needs, or you can build one yourself from scratch — your own DIY shed. Consider creating your shed if you’re a homeowner seeking for a hard do-it-yourself job. Here are some suggestions for creating your own:
- Size
It would be best if you first decided what the dimensions and layout of your shed will be once it is complete. Before taking action, you must have a well-thought-out plan for your shed. Keep in mind that various shed types have unique quirks. This planning phase will include space as a key component.
- Building Code
Before checking shed ideas, it’s good to study your local zoning regulations and construction codes. You can be subject to tight limitations on the width and height of your shed and placement restrictions depending on your locality. Failure to comply could result in various fines, including the price of removal or relocation.
- Foundation
Every wonderful item has a strong base. You can construct an “on-grade” foundation if your shed isn’t too large. Skids, which are pressure-treated wood timbers, or solid concrete, are both used to construct this. On flat ground, you can erect your foundation. It’s crucial to keep in mind not to utilize regular cinder blocks if you choose concrete.
- Material
Choose the material that best meets your shed’s requirements. You have various DIY shed material choices, including plastic, steel, and wood. Low-maintenance plastic sheds tend to deteriorate over time. Steel is strong and affordable, whereas timber is prone to rotting but is made to last when treated properly.
- Location
Choosing the precise location on your property where the shed will be put is one of the best DIY shed construction advice. While it might seem like a straightforward procedure, choosing the incorrect location could lead to the placement of an ill-fated outbuilding. Make sure the placing location is dry and, ideally, elevated a bit.
- Maintenance
Think about low-maintenance options. You can get away with a few things that would look bad on your house in a shed because it will only be in your backyard and isn’t as permanent as your home. This will save you money and time from having to make repairs in the future. The painting will take less time if you use PVC trim boards, which seldom require maintenance.
- Weather Proof
Make everything weatherproof. To prevent the dreaded deterioration of any structure component, it is necessary to construct weather-resistant flooring and floor frames. For your DIY shed, a strong floor that resists extreme weather, notably rain, storms, and flooding, is important. It would be better to weatherproof the remaining shed components while you’re at it. Your shed will last longer as a result.
- Door
The kind of door you select and where you put it can greatly affect the appearance and usability of your shed. Because of this, it is wise to install a door appropriate to your shed’s requirements. A regular-sized door might work if you plan to keep little goods like gardening or woodworking tools.
- Interior
Check out your shed’s interior. The easiest way to evaluate which room would be suitable for what portion of your DIY shed’s assemblies is to inspect the interior of your DIY shed thoroughly. Additionally, you will be able to measure the area that will house your racks, utility cabinets, or work area.
- Property Inspection
After everything is said and done, think about working with a certified property inspection specialist to ensure everything is in order. A property inspector can ensure that your deck won’t collapse on you, which is quite important, and can spot any issues that won’t appear right away but could later. The next time you need to fix your shed, they may even offer advice on how to do it more quickly and affordably.
Shed Plans Questions and Answers
The use of modular construction and low-cost materials are factors in creating a shed that is simple to build and affordable.
Building the Structure
- Create a square by using four of your two by-4s. Each board’s 2-inch edge needs to be facing up. Place the 4-inch side of one board next to the 2-inch end of the other. Utilizing your nail gun, fasten the boards together. The final product should resemble an L. By securing your other two boards; you can close the square.
- Make a pencil mark 17 inches from the end of one side of your square. Make another mark at 17 inches from your initial pencil mark. Once you have seven pencil marks that are 17 inches apart, keep going in this manner. Put this same action into action on the board across from you.
- One of your two by 4s should be placed inside your square with the ends aligned with the first pencil mark. Install the boards by using your nail gun. Nail into the ends of the board from the outside of your square. On each succeeding pencil mark, continue to position and nail the remaining two by 4s into the square. Your floor joists are this set of boards.
- Two feet from each end, measure the distance between your square’s two opposite sides. Cross these marks with your four by 4s. Your kids are the larger boards. Your kids will be mailed to your frame in the opposite direction from your floor joists. The distance between each board and the sides of your square should be two feet. Use your nail gun to affix your skids to the floor joists and frame. Your kids will need to be angle-nailed to your frame and joists.
- Put your gun’s tip on the skid about two inches above your frame. While keeping the tip of your gun compressed against the skid, raise it at a sharp angle. Make the shot. Your skid should be nailed into the frame with a nail. Continue across both skids until each floor joist has a nail driven through the skids and into it. Floor and Foundation Frame:
- 6 inches in from the ends of your skids, place a concrete block. Four blocks ought to be in position by this point. Place the final two blocks exactly in the middle. At this point, you ought to have two rows of blocks, each with three blocks. On these pillars, your skids will land.
- The remaining two by 4s should be placed across one of your block rows. Put the level on the board. You must adjust your blocks if your board is not level. You can level your construction by removing dirt or placing gravel underneath your blocks to change the height. Follow the same procedure for the second row of blocks.
- To lift your floor frame and place it on your blocks, enlist the aid of a helper. The skids of your frame should support your blocks. If not, you must reposition your body.
- On your frame, place two of your 34-inch plywood sections side by side, facing the same way as your floor joists. Using your nail gun, fasten your flooring by driving nails through your plywood and into the floor joists.
- Measure the remaining sheet of plywood and cut it into 2-by-8-foot sections. To finish the rest of your floor, you will require these sections. These sections should be on the side and at the back of your shed. These areas will see a decrease in foot traffic.
1. Install Sheds Check for permits before installing a shed. Next, make sure your structure will fit. Read the installation instructions to be prepared. Order the parts. Gather tools. You’ll need a drill, tape measure, and nail gun. Wooden stakes, string, a string level, a garden rake, and a tamper or plate compactor are needed to level the ground. 2. Elevate Before assembling your metal shed, level the ground. If not, prepare the land. Start by setting up wooden stakes and string. Use a string level to find the peak. From here, you’ll build the rest of the ground. 3. Foundation You must choose a shed base kit, floor frame kit, concrete slab, or wood base when ordering a shed. Alternatively, you can build your shed on the ground. Not advised. Your shed will be more level if it’s on a foundation, and the items inside will be safer. 4. Walls and corners After completing your shed’s foundation, place a corner panel at the one-floor frame corner. Make sure each corner panel’s widest part faces the building. Four corners total. Screw the top and bottom wall panels into place. Attach each panel’s center to the wall channel. 5. Build your structure Door jams reinforce and decorate your metal shed’s door opening. Build door jams, then screw the front wall channels between the side wall and corner channels. 6. Build your Roof Add gables. They support the roof beams on the front and back walls. Attach four roof beams to the gables, then lift and secure one on each side. Join the left and right gable with a gable brace, then attach the roof beam to the front gable’s brace. 7. Doors Built Door assembly should follow manufacturer instructions. Install door handles and braces afterward. Enter the shed. Right-side door bottom in floor frame track. Align the door’s top brace and slide. Screw the door to the slide. 8. Shed-proof After installing your shed, secure it. Many sheds include anchor kits. This ensures the shed’s safety and stability. Concrete foundations require special concrete anchors. Follow the manufacturer’s instructions for correct anchoring.
- Floor The floor is pressure-treated wood. Two 26’s should be 8′ long for the floor bands, and seven should be 7′ 9″. Nail 3 1/2-inch nails through floor bands and into floor joists. 16-inch O.C. floor joists. Attach 8′ 4×4 skids to the floor frame. Measure diagonally to square the floor frame. Three 1/2-inch nails through the floor frame and 4×4 skids secure them.
- Floor Deck Install 3/4″ T&G plywood. 2″ deck screws secure the plywood.
- R&L Wall Frame 2x4s frame the walls. The top and bottom plates are 8′ 2x4s. For wall studs, cut ten 2x4s to 6 5/8″
- Front/back wall frame The top and bottom plates are 7′ 5″ 2x4s. For wall studs, cut ten 2x4s to 6′ 5/8″.
- Ridge Top Two 2x4s should be 1’2 3/8,” and one should be 8′. Install 3 1/2′′ nails as shown.
- Rafters Rafters are 2×4. Cut ten 2x4s for roof rafters as shown. Install 2-foot-apart roof rafters. Three 1/2-inch nails through rafters, wall frame, and ridge board.
- T1-11 Exterior Siding Use 1 1/4″ finishing nails to install 4’x8′ siding. After installing siding, cut along the rafters.
- Rooftop Install 1/2-inch plywood roof deck with 2-inch nails. As shown, install 26 roof trim and 14 corner trim. Felt, shingles, and drip edge.
- Tools needed To build a loft, you’ll need: Plywood Spanners jigsaw Measurements Woodcuts 2×4 2×6 shed woodcuts Ladder Hanger-joist Drill Cutters
- Cut Plywood to Desired Size Find studs in the loft’s location. Cut plywood to loft length. 8-inch-wide. Screw plywood to wall studs using deck screws. Next, secure 2-by-4 joist hangers to plywood with deck screws. 12-16 inches apart.
- Screw Joist Hangers Fasten cut wood to joist hangers with deck screws. They’re now ceiling joists. Mark the shed’s walls and storage area’s width. Mark the joists if you’re using the full shed width.
- Braces for ceiling joists From rafters to ceiling joists, cut twice as many joists. These braces will strengthen the ceiling joists to support more weight. Screw braces to rafters and ceiling joists. Plumb the braces for maximum strength. Measure and cut plywood to fit the storage area’s ceiling joists. Fasten it to ceiling joists with deck screws.
- A small, pitched-roof shed can be built using 2×4 framing, cedar boards, and plywood shelves.
- Assemble the Framing With a center crosspiece and an angled top, construct three identical 2×4 frames. Using 2x4s at the top, bottom, front, and back, join the three frames around the door openings on the front of the framing and nail 1x2s. Utilizing a glue-like Gorilla Wood, A 2×6 header should be glued, glued, and screwed across the front.
- Install a floor and shelves. To ensure that the piece is flush with the 1x2s in the front, leave a 34-inch overhang when cutting a piece of plywood to fit inside the base of the framing. To fit around the framing, notch the plywood. Put screws and glue in it. To support shelving, screw crosspieces inside the middle and right frames. Shelving made of plywood should be screwed down.
- Side the Shed Nail tongue-and-groove cedar boards to the outside of the frame on the sides and the back. Using a circular saw, cut the top edges of the boards flush with the framing.
- Put on the Roof Nail tongue-and-groove boards to the top of the frame. The front and sides of the roof overhang.
- Construct and Install the Doors Doors’ heights should be used to determine the length of the boards (to fit below the header). For support, screw 1×3 strips across the back. Each door’s front has a 1×3 frame attached to it. Heavy-duty hinges are used to fasten the doors to the shed.
Depending on your local zoning laws and permit requirements, you might need a permit to construct a storage shed.
The shed’s total floor area does not exceed 15m2.
It is recommended that the eaves not exceed 2.5 meters in height.
If the shed is less than 2 meters from any of the property’s boundaries, its overall height shouldn’t be more than 2.5 meters. Planning permission will still be needed for designated land.
Ryan Shed Plans is a real company, yes. Both small-scale and large-scale projects can use the plans. The plan is more than just a simple drawing; it includes detailed instructions and numerous shed blueprints and designs.
The shed itself must follow the following regulations to be constructed without needing to submit a planning permission application:
The shed can’t take up more than half of your property’s total space. The shed’s total floor area is no more than 15 m2. The shed’s eaves are no higher than 2.5 meters, and the structure is one story. The building’s total height cannot exceed 2.5 meters if it is within two meters of the property line.
To put up a garden building, greenhouse, or shed in your garden, you must apply for full planning permission.
You shouldn’t require planning permission if you’re building a brick shed for a hobby, storage, or other similar purposes.
Lean to Shed Plans
Building a lean-to shed is simple. Because only three walls leaning against the fourth base need to be constructed. It has a sloping roof that prevents snow or water from gathering, making it a very solid storage idea. The ideal approach to erect a structure up against a wall or fence while maintaining lots of yard space is with a lean-to shed. Additionally, it prevents water from getting near the building you are encroaching on. The single plane sloping roof of the lean-to shed design makes building the roof straightforward, making it the easiest shed design to construct. The advantages of constructing a lean-to shed are as follows:
- Integrate Your Home
- Extremely Economical
- Fantastic in High-Precipitation Areas
- Ideal for More Compact Spaces
Loafing Shed Plans
Your animals can unwind and rest in the Loafing Shed away from the always changing weather. Taking care of your animals is simple and incredibly economical with a loafing shed. Your animals can find shelter from the wind, rain, sun, or other bad weather in a loafing shed. You can store food for your animals or utilize a loafing shed as a tack room for equipment. It is referred to as a “loafing shed” because it is an outside building created to allow animals to enter and exit freely while roaming. The Loafing Shed is often a three-sided building and is a dedicated area where your animals can congregate and interact while staying out of the elements.
Shed Roof Pole Barn Plans
You will have the choice to alter the roofing material, color scheme, roof type, and pitch as you construct your post-frame building. Your pole barn’s structural stability will be impacted by the type and pitch of the roof. The shed roof is one of the roof types used in pole barns. Smaller barns and open-air structures with restricted functions frequently employ the shed type roof, which is a single plane straight pitched roof. The front wall needs to be higher than the back wall to create a pitch, making this the easiest form of roof to frame. In northern latitudes, snow loading is a significant factor for this roof style.
Any roof type might theoretically be employed because many pole barns include standard rafter structures. Other roof types for barns include the following:
- Gambrel Roof
- Hip Roof
- Gable Roof
- Monitor Roof
- Monoslope Roof
Pallet Shed Plans
Pallet shed plans will give you step-by-step instructions for constructing your outdoor storage space. A DIY pallet storage shed can be made to your specifications and in whatever design you like to match the exterior of your house. Pallets are great since they are frequently free or nearly free. They make any construction relatively simple to put together and construct because they are essentially already framed squares. Keeping wood accessible and dry is simple with a pallet wood shed. Here are the procedures you must do to construct one.
- Select a Location
- Setting up the pallets
- Installing your posts
- Putting up your walls
- Affix the rafters and purlins.
- Assemble the roof
Run In Shed Plans
Horses and other farm animals can temporarily find shelter from the elements in a three-sided structure with an open front called a “run-in shed.” Run-in means to run into the shed in its initial portion. A run-in shed’s main function is to shield agricultural animals like horses from inclement weather such as summer heat, rain, snow, and wind. To handle huge horses, run-in sheds can be erected on site or ordered and supplied completely built.
Shed Plans with Loft
A shed with a loft is a terrific method to increase the amount of storage space available above the shed floor. The shed style is frequently used to create compact homes with lofts. You may use the loft or attic of your shed for various things. The most obvious use is, of course, to expand storage. For sleeping rooms in tiny homes, cabins, and cottages is another purpose. Or it might be a playroom in a kiddie house.
Generator Shed Plans
Generators need to be safeguarded and incorporated into their surroundings. You can use the Portable Generator Enclosure Plans to build a straightforward, sturdy, and weatherproof generator shed to store and run your portable generator safely. When your generator is wired with a transfer switch, a generator enclosure enables you to lock it in its shed to keep it out of the garage in a secure and ready-to-use location for backup power. The best justifications for constructing a container for your portable generator are listed below.
- Noise
- Security
- Aesthetic
- Weather
- Access
- Wildlife
- Storage
Shed Dormer Framing Plans
Three essential factors must be considered while designing a shed-dormer: roof pitch, overhang and header heights, and windows and trim. Shed dormers are simpler to construct than gable dormers if you’ve decided to add one to your home to provide more space or light. The flat, pitched roof of shed dormers is positioned at a complementary angle to the existing roofline. The procedure for framing shed dormers is as follows:
- Layout
- Trim Ceiling
- Dormer Framing and Existing Structure Modifications
- Taking Off the Old Roof
Saltbox Shed Plans
The shed’s front wall is higher than the back wall, which is a benefit of the saltbox design. Using less lumber overall and giving you a higher entry point at the front with lots of headroom makes them cheaper. Gardening equipment, outdoor storage, potting supplies, pool supplies, or ordinary stuff are all ideal for saltbox shed designs. Whether you require the saltbox style’s functionality or prefer the traditional New England architectural aesthetics, the style can be ideal for your backyard. They make fantastic garden shelters or workshops; building a saltbox shed is not difficult as long as you have appropriate shed plans and enough time to plan your project properly.
Trash Shed Plans
During the workweek, trash can sheds are an excellent place to hide your trash cans. When you want to throw rubbish away, all you have to do is raise the shed’s lid, thanks to its design. When garbage day comes, you open the shed’s front door and roll the trash can out to the curb. Creating a trash shed involves the following steps:
- Measure the frame.
- Side framing pieces should be cut.
- Remove the Top
- Building Front Supports
- Place the Front Crosspiece in Place
- Build the Supports for the Back Crosspieces.
- Construct a Lid Support
- The First Siding Piece Must Be Attached
- Finalize the frame’s siding
- Cut off any extra sheathing.
- Put the doors and lids together.
- Put the caps and lids on.
- Putting in the Front Doors