Bartending Kit: The Complete Tool Guide for Certification Prep 2026 July
Complete bartending kit guide — ✏️ shakers, jiggers, strainers, and pro tools. Cost breakdown, exam tie-ins, and a 5-tool minimum for new bartenders.
Walk behind any busy bar and you'll spot the same handful of tools moving in a blur — shaker tin, jigger, strainer, mixing glass. That's a bartending kit. It's the kit that separates somebody who pours from somebody who builds drinks fast, clean, and the same way every time. If you're prepping for the Bartender Certification Test, you'll be tested on these tools by name and use, so it pays to learn them properly before exam day.
Most starter kits ship with about ten to fifteen pieces. Pro kits run twenty plus. The real question isn't how many tools you own — it's whether each one earns its spot on your bar mat. A cluttered kit slows you down. A lean kit, used well, moves the line.
This guide breaks down every tool you'll see on the job, what each one does, why the cheap ones cost you tickets, and how kit choice ties into the certification path. We'll cover shakers, jiggers, strainers, bar spoons, muddlers, and the little extras — peelers, channel knives, smoke guns — that turn a competent bartender into a wanted one.
Here's the truth nobody tells new hires. Your kit is your résumé. Show up to a trail shift with a beat-up tin and a bent strainer? Managers notice. Show up with a weighted Boston shaker, a Japanese jigger, and a Hawthorne strainer that actually fits? Different story. Tools matter.
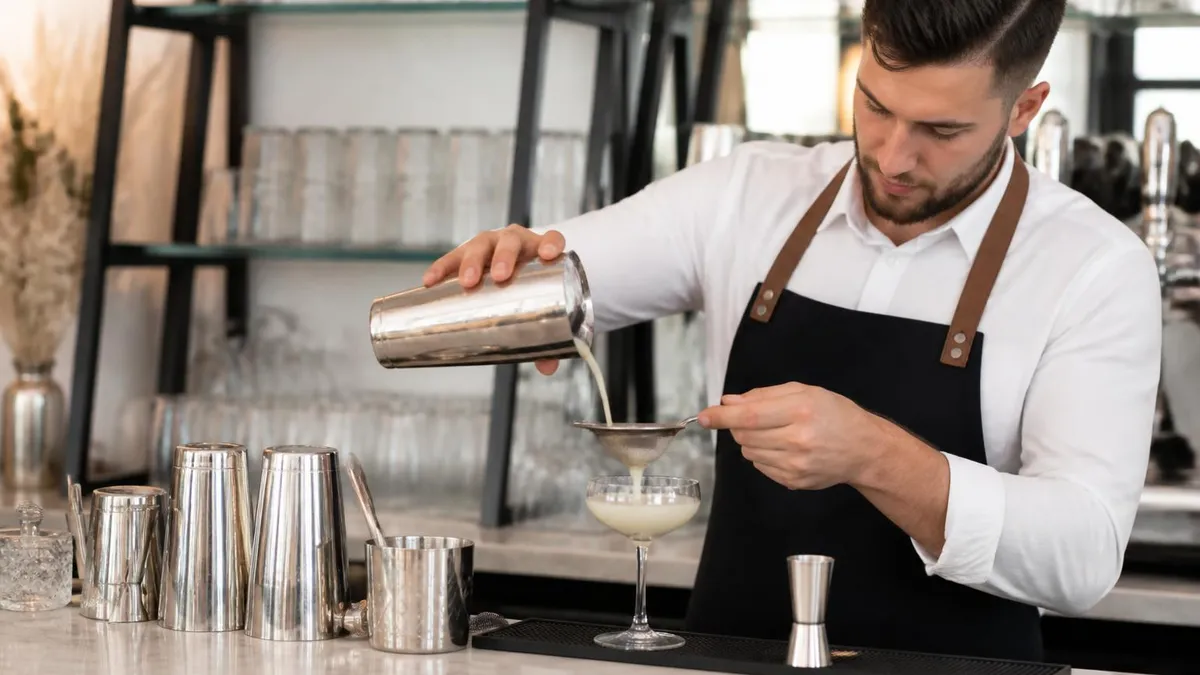
Shakers come in three styles — and you'll meet all three on the certification exam. The Boston shaker is two tins (or a tin and a mixing glass) that seal together with a tap. American bars love it. Fast, durable, easy to clean. The Cobbler shaker is the classic three-piece — tin, built-in strainer, and cap. It's pretty, it's slow, and it sticks when the metal contracts on cold. The Parisian shaker is two-piece, no built-in strainer, smoother than a Cobbler but rarer in the wild.
Pick one and learn it cold. For most working bars in the United States, that's the Boston. Weighted tins beat thin tins because they seal harder and won't dent when you tap them open on the rail. Bonus — they keep drinks colder while you shake. Spend the extra eight bucks.
Shaking technique gets tested in practical exams too. The dry shake (no ice), the wet shake (with ice), and the whip shake (one pellet of ice) each produce different textures. If your bartending school covers cocktail families, you've already heard the rule — egg whites get dry-shaken first, then wet-shaken. Knowing why ranks you above the room.
Bartending Kit at a Glance
If you can only afford five tools, get a weighted Boston shaker, a Japanese 1.5/0.75 oz jigger, a Hawthorne strainer, a fine-mesh strainer, and a 30 cm bar spoon. That covers 95% of cocktails on a working bar — and 100% of the tools you'll see on the certification exam practical.
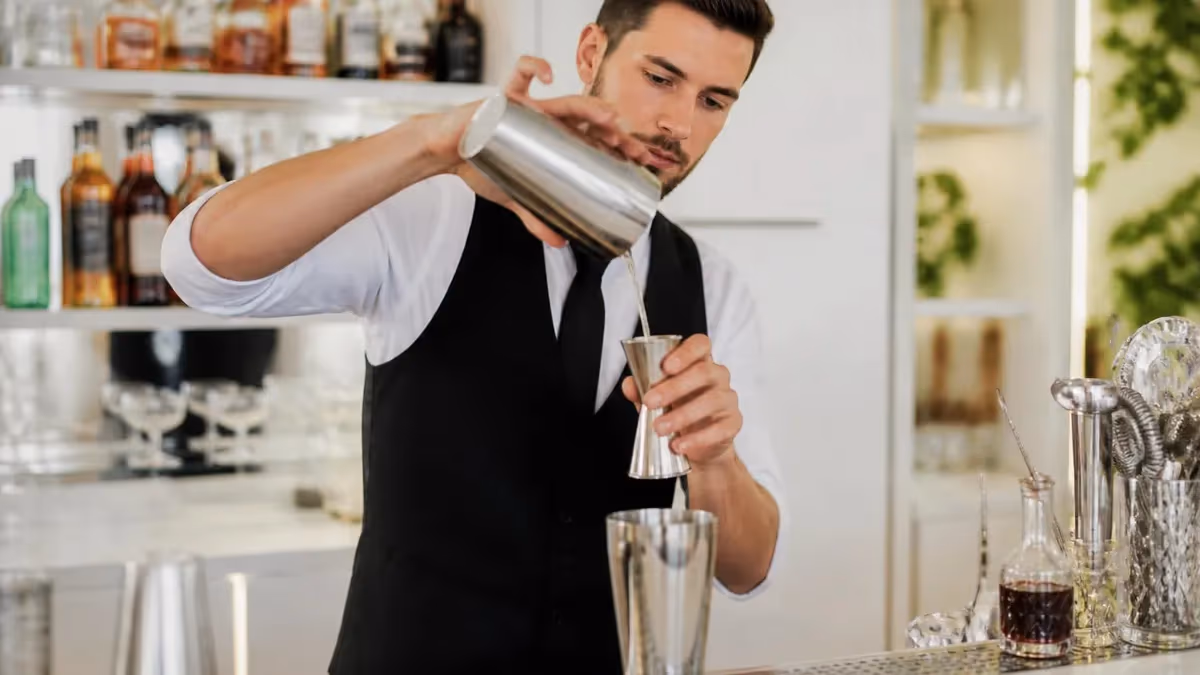
Next up — jiggers. A jigger is a two-sided measuring cup. One side bigger, one smaller. The standard American jigger is 1 oz / 0.5 oz or 1.5 oz / 0.75 oz. Most cocktail recipes call for the second pairing, so that's the one to buy first. Japanese jiggers — tall, narrow, with graduated lines etched inside — read faster than the squat US version. Easier on the wrist. Less spillage. They cost more. They're worth it.
Free-pouring (counting seconds instead of using a jigger) is a separate skill. Some bars ban it. Some require it. The certification exam doesn't usually test speed pours, but it does test that you can identify a jigger, name both sides, and explain why measuring builds consistency. Studying with a real bartender kit in your hand beats pure textbook prep every time.
Strainers separate ice and pulp from the finished drink. Three matter. The Hawthorne — that's the round flat one with the coil — sits on top of a tin and catches ice cubes. Push the tab forward to tighten the coil for fine strain. The Julep strainer — a perforated metal spoon — fits inside a mixing glass for stirred drinks like Manhattans. The fine-mesh (tea) strainer is the second strainer you double up with for citrus drinks. Pulp out, silk in.
On the exam you'll likely match each strainer to a cocktail family. Shaken drinks? Hawthorne plus fine. Stirred drinks served up? Julep. Knowing this combo cold saves you on multiple questions.
Bar spoons are the long twisted ones — usually 30 to 40 cm. The twist isn't decorative. It lets the spoon turn smoothly between your fingers when you stir, which is how you cool a drink without watering it down. American spoons have a red plastic cap on the end. Japanese spoons have a teardrop. European spoons sometimes have a fork tine for garnish work. Pick whichever feels natural. Practice the finger-roll stir for a week. You'll never go back.
Muddlers — short wooden or plastic pestles — crush herbs, fruit, and sugar in the bottom of a glass. Buy unfinished hardwood. Painted muddlers chip into the drink. Plastic muddlers grip the glass better and won't absorb flavors. Mint gets pressed (not pounded). Limes and sugar for a Caipirinha get worked harder. The exam loves muddling questions because it's where new hires bruise the herbs and ruin the drink.
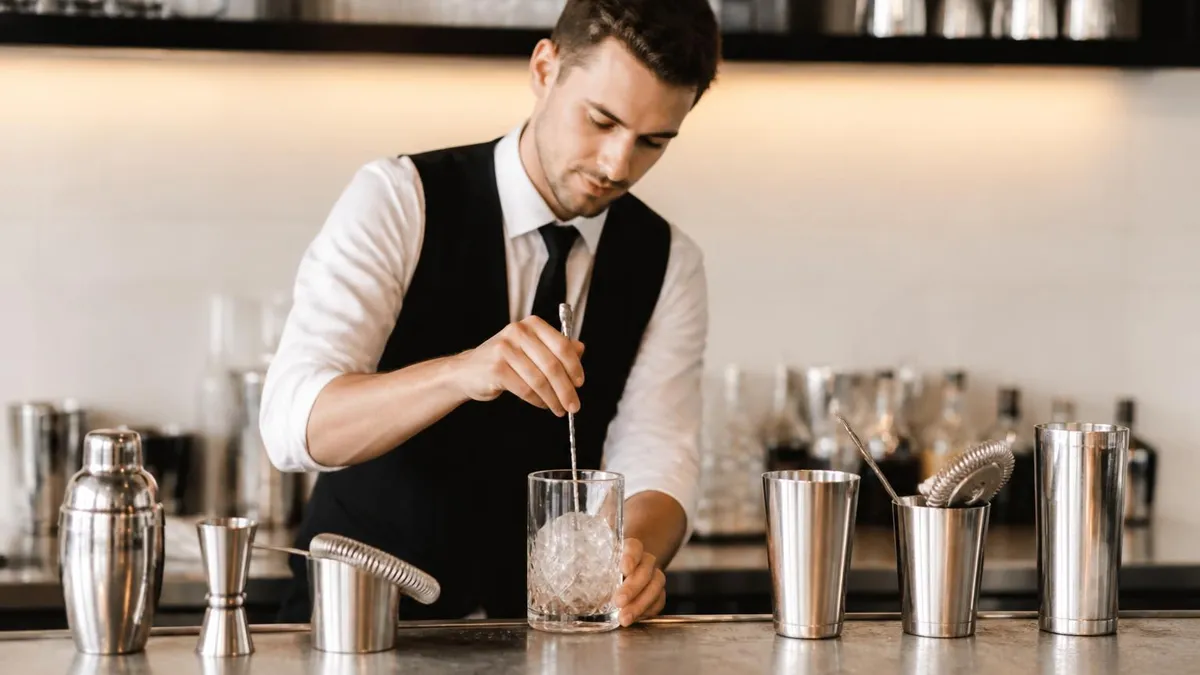
A mixing glass — sometimes called a Yarai glass for the Japanese diamond-cut version — is where stirred cocktails live. Glass holds cold longer than a metal tin once it's pre-chilled. Big enough? Sixteen ounces minimum. Too small and your stir gets sloppy.
Garnish tools are where personality shows up. A channel knife carves twists. A Y-peeler shaves wide strips of citrus zest for an oil-expressed garnish. A paring knife handles wedges, wheels, and flag picks. A small cutting board (composite, not wood — health code) sits on the bar shelf. Tweezers — yes, tweezers — place delicate garnishes without finger prints. The pros use them. So should you.
Core Tool Categories Every Bartender Needs
Boston, Cobbler, or Parisian — used to chill and dilute drinks built with juice, dairy, or egg whites. Most American bars favor the weighted Boston for speed and durability on a busy service line.
Two-sided measuring cups for accurate pours. Japanese (tall, narrow) reads faster than American (squat), and the rim dome is part of the measure — fill to the absolute brim.
Hawthorne for shaken cocktails sits atop the tin and catches ice. Julep for stirred drinks inside a mixing glass. Fine-mesh strainer for double-strain on citrus and pulp.
Long twisted handle, 30 to 40 cm. The twist isn't decorative — it lets the spoon turn smoothly between your fingers using the finger-roll stir that traces the inside of the glass.
Unfinished hardwood or food-grade plastic pestles. Bruise mint gently, crush sugar cubes, work limes harder for Caipirinhas. Painted muddlers chip and contaminate drinks.
Channel knife for citrus twists, Y-peeler for wide oil-expressed strips, paring knife for wedges and wheels, tweezers for plating, and a composite cutting board (never wood — health code).
Metal ice scoop (never glass — broken glass in the well shuts down service), Lewis bag and mallet for crushed ice, tongs for the single big rock in an Old Fashioned.
Metal pourers with cork stoppers deliver consistent flow rates near 1 oz per 2 seconds. Replace corks every couple of months to maintain accuracy and prevent air leaks.
Kit Tiers by Budget
Boston shaker, one double-sided jigger, Hawthorne strainer, basic bar spoon, plastic muddler, ice scoop, and a canvas roll. Enough to sit the exam and trail a first shift.
Skip the cheap branded bundles on Amazon. Buy each piece separately from a restaurant-supply site. You'll spend the same, but every tool will be the right weight and material.
Don't skimp on the knife. Dull blades cause cuts more often than sharp ones. A six-inch utility knife at fifteen bucks does the job for the first year. After that, upgrade. Your fingers will thank you.
Ice tools are quietly the most important. An ice scoop (metal, never glass — broken glass in the well is a full-shutdown event) moves cubes from the well to the tin. An ice mallet and Lewis bag crush ice for juleps and tiki drinks. Ice tongs handle the single big rock for an Old Fashioned. Ice picks shape Japanese-style hand-cut blocks. The exam touches on ice — what size for what drink — so memorize the matchups.
Glassware isn't strictly part of your kit, but you'll be quizzed on it. Highball, Collins, rocks, double rocks, Nick & Nora, coupe, martini, hurricane, snifter, flute. Each style has a fill line and a temperature target. Pre-chill the glass for anything served up.
Then come the toys. Smoke guns inject hickory or applewood smoke under a glass dome. Spray atomizers mist absinthe or peat-heavy Scotch over a finished drink. Dehydrators turn citrus into wheels that last weeks. None of these show up on a basic exam. All of them show up on a good résumé. Save them for after you've nailed the basics.
Choosing your first kit is simpler than the gear nerds make it sound. Buy stainless steel everywhere you can. Avoid copper-plated tools — the plating chips, the copper underneath reacts with citrus, and the drink picks up off flavors. Skip carbon steel knives unless you plan to oil them every shift. Stainless is friendlier.
Maintenance is half the battle. Wash tins in warm soapy water after every shift. Dry them immediately. Sharpen knives weekly. Polish jiggers with a microfiber cloth before service so the rim catches light when you pour. Little things, but managers see them.
Carrying your kit matters too. A roll-up canvas bag with elastic loops keeps every piece in place during travel. Hard cases protect glass mixing vessels on a flight. Don't carry your kit loose in a backpack — tools rattle, edges chip, the strainer coil bends.
Tying it back to certification. Most state and provincial exams test tool identification, sanitation procedures, and the standard pour. Some — TIPS, ServSafe Alcohol, Smart Serve in Canada — focus heavily on alcohol awareness rather than mechanics. Others, like many city programs, throw in a practical component. If you're not sure where to start, try some bartending classes first, then sit the exam with confidence.
1) Copper-plated tools — the plating chips and reacts with citrus, fouling the drink.
2) Painted muddlers — paint flakes into drinks and is considered a contamination event by health inspectors.
3) Magnetic stainless — it's iron-doped and will rust within six months. Test every metal tool with a magnet before you buy.
Pre-Shift Kit Checklist
- ✓Wipe down every tool with a clean microfiber cloth and inspect for nicks or dents that could affect performance during service
- ✓Check shaker tins seal cleanly with a single firm tap and pop open without sticking when you strike the rim against the rail
- ✓Verify jigger has no dents on the rim and that the inside graduated lines are still legible under bar lighting
- ✓Confirm Hawthorne strainer coil is tight, spaced evenly, and fits flush against the tin without gaps that would let ice through
- ✓Sharpen the paring knife edge if it's been more than a week since the last hone — dull blades cause more accidents than sharp ones
- ✓Restock garnish picks, straws, napkins, citrus wheels, olive picks, and any specialty garnishes called for on tonight's menu
- ✓Pre-chill mixing glasses in the bar well or freezer so stirred drinks lose less dilution during the first thirty seconds
- ✓Set up your station mirror — same exact layout every shift so muscle memory takes over during the rush

Going the structured route? Bartending school lasts two to eight weeks and covers tools, recipes, garnishes, and customer service. Cost runs $300 to $800 depending on the city. Online options are cheaper and slower but stack flexibility for working adults. Either way — you finish with a wallet card, a kit, and a list of bars hiring out of the program.
Want shop floor experience first? Hit the listings for bartending jobs at hotel bars and chain restaurants. They train. They pay. They don't always require certification on day one. Bring your kit, show up early, ask questions. That trail shift is your real interview.
A few last gotchas. Don't buy a kit on the cheap end of Amazon without checking weights and materials. Magnetic-feeling stainless is iron-doped — it'll rust. Real food-grade 18/8 or 18/10 stainless is non-magnetic or only weakly magnetic. Test with a magnet at the store. Avoid jiggers with rolled rims — they pour wide and inaccurate. Stick to ground rims.
And one habit that costs nothing — label your tools. A piece of colored tape on each handle, matching your section, stops the dishwasher tray from swallowing your favorite shaker. Sounds small. After three months on a busy line, you'll be glad you did it.
Your kit grows with you. Year one — basic Boston, two jiggers, two strainers, spoon, muddler. Year three — Japanese jigger, Yarai mixing glass, channel knife, tweezers, ice tongs. Year five — your own peg of nail polish on the case so nobody else borrows it. The kit becomes part of how regulars recognize you.
Whatever your path — certification first, school first, or job first — invest in the tools. They pay back fast. A clean drink built with a clean kit moves the line, builds tips, and keeps managers off your back. Study the exam content, learn the gear by touch, and the rest follows.
Now — a deeper look at the tools you'll touch every shift. Start with the shaker tap. Most new bartenders don't realize the tap is technique, not luck. Hold the tin steady. Don't grip the top tin like a hammer. Strike with the heel of your palm exactly where the two tins meet, at a slight angle pointing away from your body. The seal pops every time. Pound the top of the tin and you'll bend the rim. Bent tins leak.
Owning Your Own Kit: Pros and Cons
- +A well-built kit pays for itself in tips inside a month
- +Tool-specific exam questions become automatic once you own the gear
- +Quality tools cut prep time and reduce broken glassware on shift
- +Carrying your own kit signals professionalism to hiring managers
- +Modular kits grow with your skill set — no need to buy twice
- −Cheap kits often need full replacement inside six months
- −Specialty tools (smoke guns, atomizers) rarely appear on entry-level shifts
- −Carrying a heavy kit between venues gets old fast
- −Damaged tools (bent strainer coils, chipped tins) cost real money to swap
- −Some bars require you to use house equipment regardless of your kit
Jigger technique — fill to the brim. All the way. Surface tension creates a tiny dome above the rim. That dome is part of the measure. Stop the pour a hair early and you're under by 5%. Do that across a cocktail with three measured ingredients and the drink tastes wrong. Patrons can't always say what's off. But they can taste it. And they don't come back.
Strainer drills are worth running cold. Stack a Hawthorne on a tin. Hold the strainer tab with your index finger. Tilt forty-five degrees over the glass. Watch the liquid clear the coil, not the tab. Closed coil for fine strain, open coil for a slightly chunkier pour over ice. Practice with water at home until the wrist motion is automatic. Then practice with real ice. The added weight changes everything.
Mixing glass stirring is its own art. Drop ice in first. Add ingredients on top of the ice. Slide the bar spoon down the inside of the glass — not into the middle. The spoon turns between your thumb, index, and middle finger. The bowl traces the inside wall. Stir for twenty to thirty seconds depending on the recipe. The drink should drop ten to twelve degrees and gain about 15% dilution.
One tool people overlook? A solid speed pourer. The plastic ones that come in the bottles? Replace them. Get metal pourers with cork stoppers. They pour at a consistent rate — usually around 1 oz per 2 seconds. That consistency is what lets pros free-pour without losing accuracy. Replace the corks every couple of months because they shrink and let air past.
Bottle openers — yes, you need one on your kit. The waiter's friend (a folding speed opener) is the gold standard. Cheap ones snap at the joint. Spend ten dollars more for one that lasts five years. Match it with a wine key that has a Teflon-coated worm so the screw glides into the cork without crumbling it. Crumbled corks in a glass equal a comped bottle.
On the certification side — different exam boards weight the tool questions differently. ServSafe Alcohol focuses on responsible service rather than mechanics, so you'll see almost no kit questions. State boards in Florida, Illinois, and Pennsylvania throw a few in. Province boards in Canada (Smart Serve, ProServe) blend tools with responsible service. Check the exam blueprint before you study so you spend time on the right material.
One more habit worth building. Inventory your kit weekly. Open the roll, lay every tool on the bar, count, photograph. Why? Tools walk. Co-workers borrow. Lost gear adds up. Knowing what's missing the day after it goes missing — instead of three weeks later — saves real money and keeps your kit complete heading into the next shift. Make it a Sunday ritual.
Last thing — read the room. Some craft bars take pride in matching staff kits, and showing up with your own gear feels off. Other bars expect every bartender to bring their own everything. Ask during the interview. It's a small question that signals you've worked before and you respect the program already in place.
Bartender Certification Questions and Answers
About the Author
Executive Chef & Culinary Arts Certification Educator
Culinary Institute of AmericaChef Marco Bellini is a Certified Executive Chef and graduate of the Culinary Institute of America with over 20 years of professional kitchen experience in Michelin-recognized restaurants. He teaches culinary arts certification, food safety, and hospitality exam preparation, having guided thousands of culinary students through their ServSafe, ProStart, and professional chef certifications.
Join the Discussion
Connect with other students preparing for this exam. Share tips, ask questions, and get advice from people who have been there.
View discussion (5 replies)