
Menu Design Practice Test
Updated for July 2026Menu Design Questions and Answers
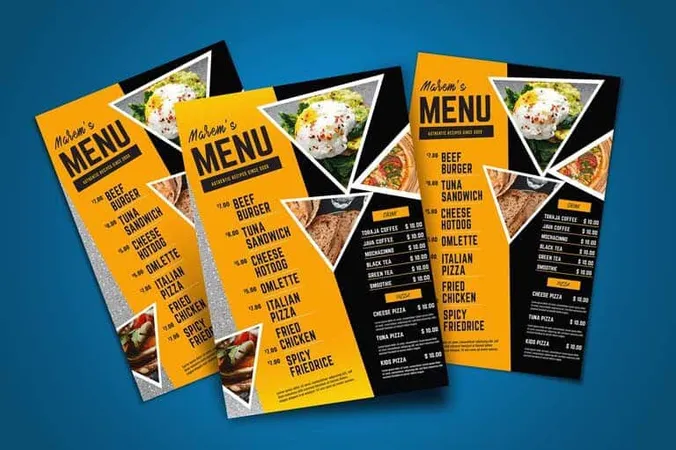
- Get your menu ready. The first step in this process is choosing the major categories and cuisines you want to offer on your menu. To choose what you can serve at your restaurant, it is advised that you consult with your cooks. These foods can be separated into other groups, including starters, hors d’oeuvres, main courses, desserts, and chef’s specialties.
- Select a design program The profit margins and menu design ultimately determine the success of a restaurant. To develop the ideal menu, selecting the appropriate design tool is crucial. To simplify this task, numerous online restaurant menu creator choices are available to busy cooks and restaurant owners.
- Set up your menu. Customers expect menus to be clear. An extensive menu list without any categories can be daunting. Sort your dishes logically and in order. For instance, group your goods into categories like “Omelets,” “Soups,” or “Pancakes” rather than placing them all under “Breakfast,” “Appetizers,” or “Lunch.”
- Create your menu. The ideal way to design a menu is to make it distinctive from others in terms of appearance, language, and substance. The adage “Don’t judge a book by its cover” may come to mind. For menus and restaurants, the situation is essentially the opposite. The ideal menu conveys information about the restaurant. It should summarize the full dining experience, from the menu and drinks to the setting and furnishings.
- Ask for comments. Regarding the general caliber of the menu, it is a good idea to ask nearby eateries and food critics for helpful suggestions. You may streamline your menu with these sector experts, who can also assist you get it ready for printing.
- Place a menu order It’s time to get the menu printed now that the final version is complete. While any nearby printing company can assist you with this, choosing one that focuses on printing restaurant menus is ideal. These companies will be better able to advise you on the best paper to use and printing techniques for your design. To choose a service that best meets your needs, you can ask other restaurant owners for advice or do your research online.
The price to develop a restaurant menu is $500–$600. Try our Photoshop practice test.
- Select a sample drink menu. Choose the style that, in your opinion, best suits your bar or eatery. Whether your cocktail bar is a fresh, hip place or a hole in the wall, we have templates for all types of cocktail bars. We got your back.
- Insert images. You may quickly add or remove photographs of your cocktails using our menu maker. Select a huge image that displays your bar’s whole menu, or add smaller photos with each drink. It’s all up to you.
- Add your brand. Drag and drag the logo for your cocktail bar into the layout.
- Change the hue. Change colors quickly to complement the design of your cocktail bar. We have various vivid and electrifying hues if you specialize in fruity concoctions. We offer darker, more solemn grays and browns for whiskey bars.
- Purchase prints Order your prints once you are satisfied with your design. You have the choice to laminate your menus at checkout if you wish to shield them from cocktail spills.
- You can always change your cocktail menu. Anytime you want, return and make changes to your drink menu layout. You can always add new drinks, including food items, and do much more because everything is always stored in your account.
- Look up a menu Open Word, then click File, then New. In the search box at the top of the screen, type “Menu,” then hit Enter. This will provide you with a list of available menu templates; alternatively, you can explore and download templates from the Microsoft website.
- Construct a fresh menu A design you like can be created by clicking it and then choosing to Create. The template will then be available for editing.
- Edit the template You can now enter all of your food, beverages, and specials and swap out any stock photos for your own. Let your imagination go wild, and design a menu that honors your restaurant.
- Make the menu your own. Add your color scheme to the menu to complement the restaurant’s theme. To achieve this, click on Colors after choosing Design from the menu at the top of the screen. This will provide you with a list of the available color schemes and the option, if you like, to build your own.
The price of a menu design can range from $0 to more than $2500, depending on whether you do it yourself or hire a designer or agency.
- Make sure the drinks on your menu are prominent. Keeping food and drink separately is crucial for a successful bar menu. To capture attention and give your consumers a seamless ordering experience, add a drinks section or page to your menu after or before food items.
- When possible, order drinks from a menu. A table tent is an effective tableside tool to increase sales where it matters most, and a solo menu can entice customers to spend more time learning about all the delectable beverages you have to offer. Our extensive collection allows you to easily discover the ideal size for your new bar menu. Additionally, almost all our menu items come in washable or disposable varieties for those who place a premium on cleanliness.
- Make use of pertinent titles. Regarding wines, your bar menu may need to be simple. Customers typically have previous preferences for their favorite wines. Therefore it’s crucial to organize wine lists simply with sections like “Pinot Noir” or “Chardonnay.” In contrast, patrons seeking a cocktail menu can seek a novel or unexpected experience. With amusing names like Summer Dream or The Godfather, your bartender can demonstrate his or her inventiveness. Trying to match the drink names to the customer’s mood will be worthwhile.
- Employ superb images. Visuals that are professionally produced or of a high caliber showcase your beverages to their greatest advantage and establish a mark of luxury for your company. When customers see your restaurant’s best, good images help pique their appetites and boost sales.
- Emphasize your specialties. Use artwork like a border or banner to draw attention to your top things. Think about highlighting your menu’s most popular or profitable items, so they stand out and are easy to spot. The Menu Maker’s extensive capabilities enable users to add accents to any menu with ease and don’t require any prior design knowledge.
- Use original copy. Innovative or entertaining descriptions increase sales, improve the customer experience, and, most importantly, help you develop a recognizable brand that encourages repeat business.
- A remarkable menu has the correct aesthetic. Your menu stays current and engaging with the help of your logo, brand colors, and high-contrast accents or backgrounds. With thousands of fully editable themes, you can match your beverage menu to your brand, glassware, or décor and quickly switch themes with a single click.
- Start a new project. Open Adobe Illustrator, then choose File > New to start a new project. Enter the resolution of your monitor. Most landscape screens are 1920 by 1080 pixels or 1080 by 1920 if portrait displays are more appropriate for your company. Additionally, make sure your Color Mode is RGB under “Advanced.”
- The grid We’ll put up our grid now that we have a project to work with. This will make it simple to create our menu items and maintain a neat alignment. Remember that your grid selections will differ if you’re using another application. By selecting View > Show Grid, you can activate the grid. Verify that “Snap to Grid” and “Snap to Point” are turned on. We’ll be able to construct more quickly and precisely as a result.
- Background color You may begin creating the menu now that we have a beautiful project and workspace.
- Add a picture (optional) I’d like to add a brewery picture to make my menu seem and feel better. It will be dimly visible because it will be partially transparent, but even the smallest details count.
- Add a logo and typography After creating a pleasing background, let’s finish it with a logo.
- Menu dividers and “sections.” There are several different kinds of beer at my brewery. Therefore, I want to keep them divided into sections. Make a few division dividers using the rectangle tool on the left toolbar. Thanks to our grid, you’ll see that the rectangle “snaps” into position. I’ll also give the rectangles a 15% opacity to give the divisions a pleasant appearance. This makes them “quieter” and maintains equilibrium.
- Menu items Since our structure is in place, we can now add the menu item text. Our text needs to have a hierarchy, with the most important text being the biggest and boldest and the least significant text being the smallest and thinnest.
- Upload and export The menu is accessible now. Simply export it from Illustrator and post it to one of our displays. Navigate to File > Save for Web in Illustrator. Verify again that JPEG High is chosen (this is typically the best option for size/appearance) and then click “save.”
- OkMenu – QR Ordering
- Menu. Food & Drink. Menu Maker – Restaurants eMenu. Food & Drink.
- Dinner Buddy Meal Planner. Food & Drink.
- Easy Menu Planner. Food & Drink.
- Restaurant menu maker. Food & Drink.
- My Digital Menu. Food & Drink.
- Start Canva Search for “Restaurant Menu” in Canva. Open a new page, then either begin designing from scratch or locate a template that is ideal for you.
- View templates Choose the best restaurant menu from our collection of well-crafted templates. Utilize the search features to select designs with various color schemes, layouts, and themes, then begin customizing.
- Make your meals unique To make your design perfect, experiment with elements from several templates. Upload and utilize your logos and images to create a personalized menu. Change your fonts and color schemes with only a few clicks.
- Explore more options and include more components. More appealing pictures are needed. Browse our enormous collection of free and premium stock photos, illustrations, and vectors. Experiment with photo filters, frames, and grids for the ideal layout.
- Write up or print Utilizing the Share option, post your restaurant’s menu immediately on social media. Download, save as a PDF, and then print them off to give to your clients.
An app or website’s hamburger menu icon is one that, when clicked or pressed, displays a side menu or navigation drawer. A “hamburger menu” is what it is named since it resembles a well-known sandwich.
Menu Design Practice Test Questions
Prepare for the Menu Design exam with our free practice test modules. Each quiz covers key topics to help you pass on your first try.
Menu Design MCQ
Menu Design Exam Questions covering MCQ. Master Menu Design Test concepts for certification prep.
Menu Design
Free Menu Design Practice Test featuring Menu Design. Improve your Menu Design Exam score with mock test prep.
Menu Design Trivia
Menu Design Mock Exam on Trivia. Menu Design Study Guide questions to pass on your first try.
Menu Design Color Theory in Menu Design
Menu Design Test Prep for Color Theory in Menu Design. Practice Menu Design Quiz questions and boost your score.
Menu Design Digital Menu Design
Menu Design Questions and Answers on Digital Menu Design. Free Menu Design practice for exam readiness.
Menu Design Menu Engineering
Menu Design Mock Test covering Menu Engineering. Online Menu Design Test practice with instant feedback.
Menu Design Menu Photography and Visual Me...
Free Menu Design Quiz on Menu Photography and Visual Merchandising. Menu Design Exam prep questions with detailed explanations.

Menu Design Key Concepts
What is the passing score for the Menu Design exam?
Most Menu Design exams require 70-75% to pass. Check the official exam guide for exact requirements.
How long is the Menu Design exam?
The Menu Design exam typically allows 2-3 hours. Time management is critical for success.
How should I prepare for the Menu Design exam?
Start with a diagnostic test, create a 4-8 week study plan, and take at least 3 full practice exams.
What topics does the Menu Design exam cover?
The Menu Design exam covers multiple domains. Review the official content outline for the complete list.
Game Menu Design
The 'A' and 'B' buttons in video games serve as standard inputs. Players can use them to advance through the game and to revert back to the main menu, while the 'X' and 'O' buttons are used to exit the game and quit. Despite this, some video games still lack proper game menu design and fail to keep players interested. Try our book design practice test.
If you want your menus to be readable and engaging, you need to consider how the objects in the menu are used. They should provide a clear clue to users about their roles. Moreover, you must test their usability and manipulation in order to make sure that they can be operated easily and quickly. It is important to consider the fact that gamers are addicted to gaming experiences and don't want to wait for lengthy loading times.
Some of the most successful video game menu designs have visual characteristics that aid users in understanding how to use them. For instance, toggle switches may have arrows that indicate which direction they should be moved in. In a menu, these features should be placed prominently on the screen so that they are easy to find and navigate.
- +Industry-recognized credential boosts your resume
- +Higher earning potential (10-20% salary increase on average)
- +Demonstrates commitment to professional development
- +Opens doors to advanced career opportunities
- −Exam preparation requires significant time investment (4-8 weeks)
- −Certification fees can be $100-$400+
- −May require continuing education to maintain
- −Some employers may not require certification
Menu Design Questions and Answers
About the Author

Certified Professional Development Expert & Niche Certification Advisor
University of Pennsylvania Graduate School of EducationDr. Alexandra Kim holds a PhD in Professional Studies from the University of Pennsylvania and is a Certified Professional in Learning and Performance (CPLP) and Certified Professional in Talent Development (CPTD). With 17 years of corporate training and professional certification advisory experience, she helps professionals navigate specialized, emerging, and cross-industry certification programs.